

Driving Digital Performance for a Digital Media Brand
Headless CMS scales and improves WPWhiteBoard’s content distribution, flexibility, and personalization
Sahil Mahalley
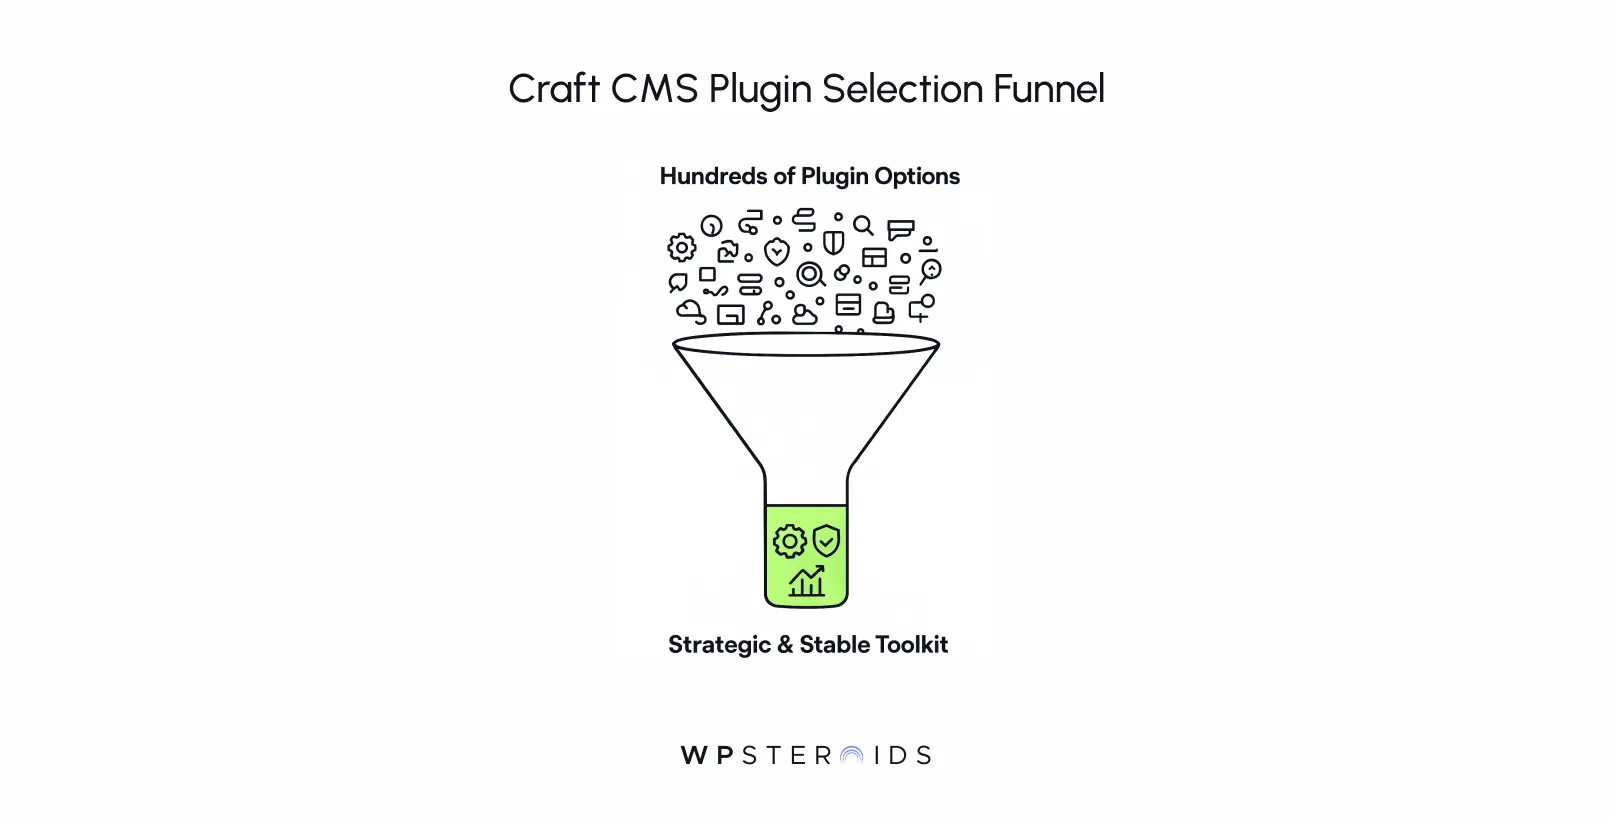
Staring at the Craft CMS Plugin Store, scrolling through hundreds of options? Creates a lot of confusion!
Choosing the right extensions for your project can feel like a high-stakes decision. You know the potential is huge—the right tools can unlock powerful new features, streamline your workflow, and delight your clients.
But the risk feels just as real. Pick the wrong plugin, and you could compromise your site's performance, introduce security vulnerabilities, or create a maintenance nightmare that haunts you for years.
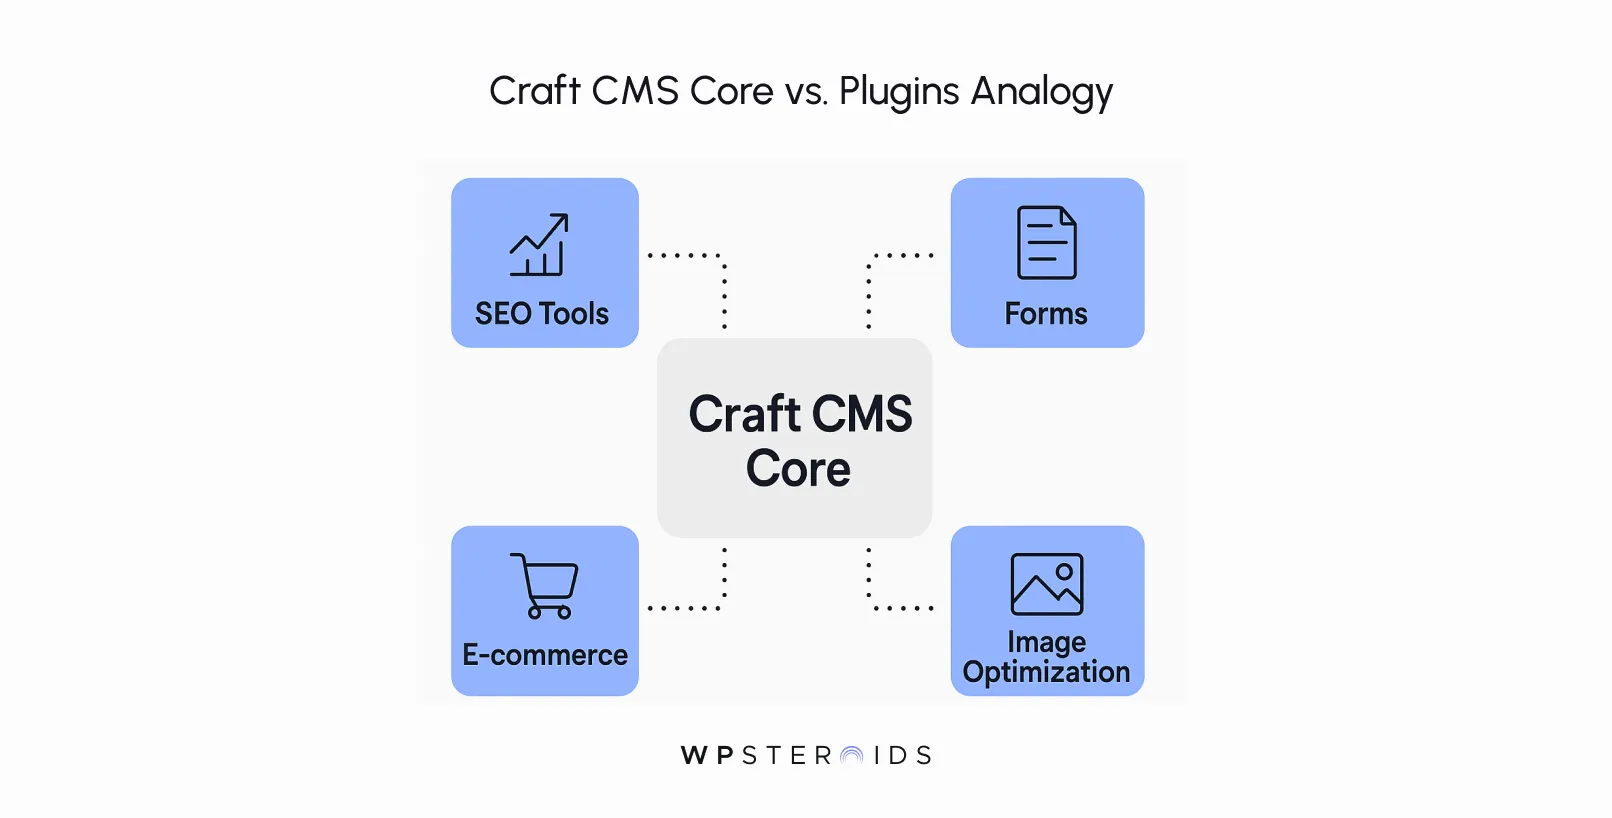
Craft CMS plugins are the primary way to extend Craft's core functionality with specialized features like SEO automation, advanced forms, or full e-commerce capabilities.
Available through the official Plugin Store, these software packages are essential for building highly customized websites.
Because plugins add functionality without altering the core system, they create powerful, feature-rich sites that are modular, stable, and easy to maintain and scale over time.
This is a strategic framework for how to think about, select, and manage your plugins for long-term success.
Don’t just choose CMS plugins; rather, know why they're the right choice for a stable, scalable, and powerful Craft CMS project.
A Craft CMS plugin is a self-contained package of code designed to add specific features and functionality to your website.
Think of Craft CMS as a beautifully engineered, high-performance car engine. It's powerful and reliable on its own. CMS plugins are the factory-approved accessories you can add: a state-of-the-art navigation system, upgraded suspension, or a custom sound system.
They integrate perfectly without forcing you to rebuild the engine itself.
This approach is fundamental to the platform's stability. By keeping this new functionality separate, you ensure that the core Craft CMS installation remains clean, secure, and easy to update.
This modularity gives Craft plugins a strong advantage, allowing you to build incredibly sophisticated, custom websites without painting yourself into a technical corner.
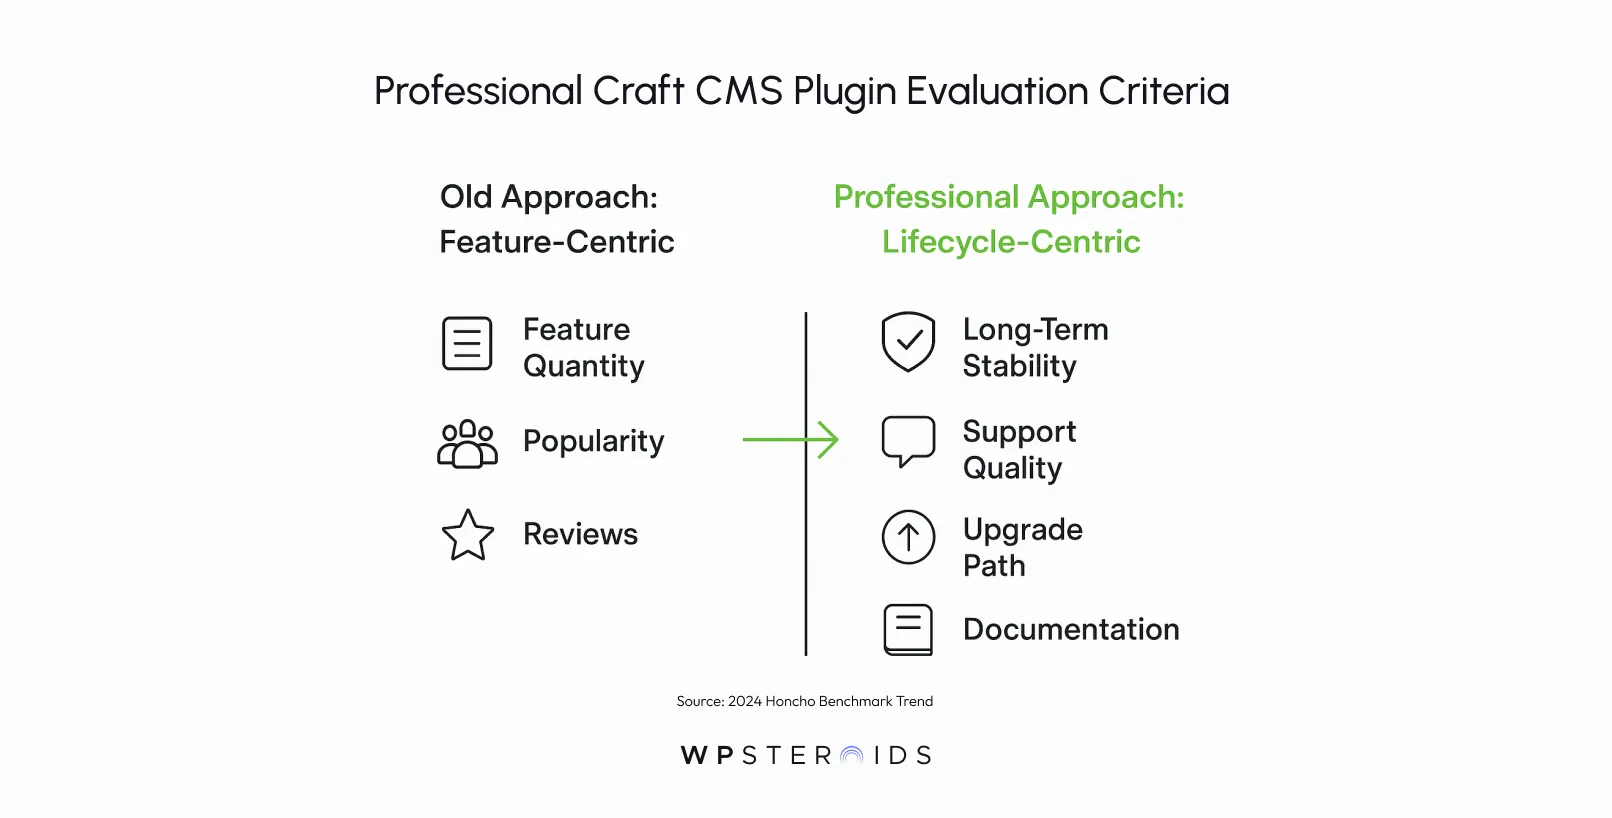
For years, the conversation around plugins was dominated by one thing: features.
The more a plugin could do, the better it was perceived to be. But as the platform has matured, so has the thinking of the professionals who rely on it.
Simply chasing the longest feature list is a rookie mistake that can lead to bloated, unstable websites.
The professional community is now shifting its focus.
Developers are increasingly vetting plugins for migration readiness, ongoing compatibility with Craft 5, and strong documentation.
This is the new gold standard for evaluation: a plugin isn’t just a one-time install; it’s a long-term commitment.
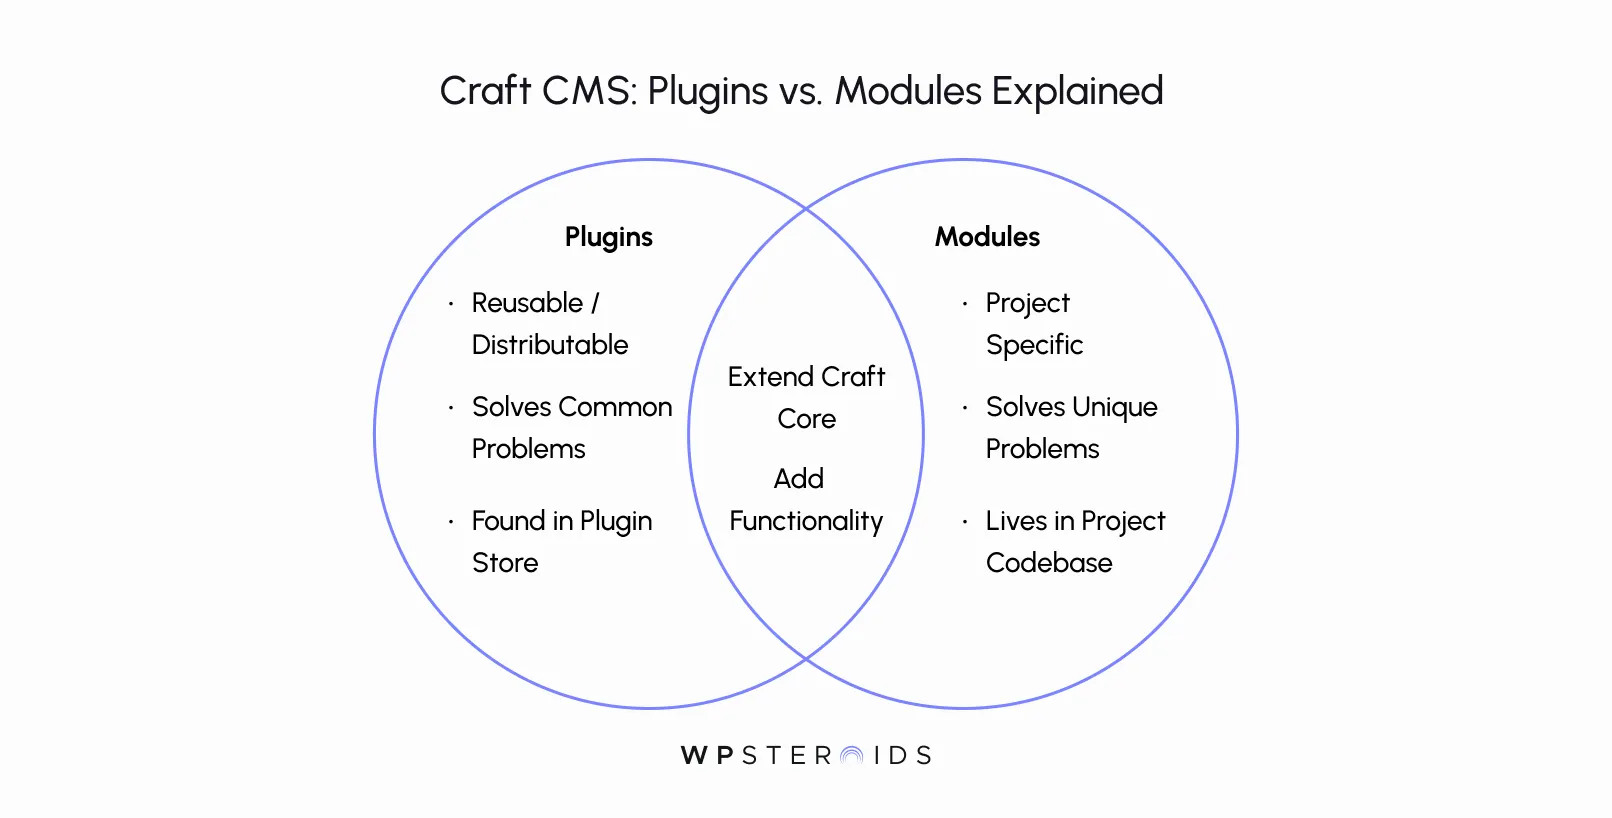
As you get deeper into the Craft ecosystem, you'll encounter another term: modules. Understanding the difference is crucial for making smart architectural decisions.
Choosing a plugin is like buying a high-quality tool off the shelf. Building a module is like forging a custom tool for a very specific, one-of-a-kind job.
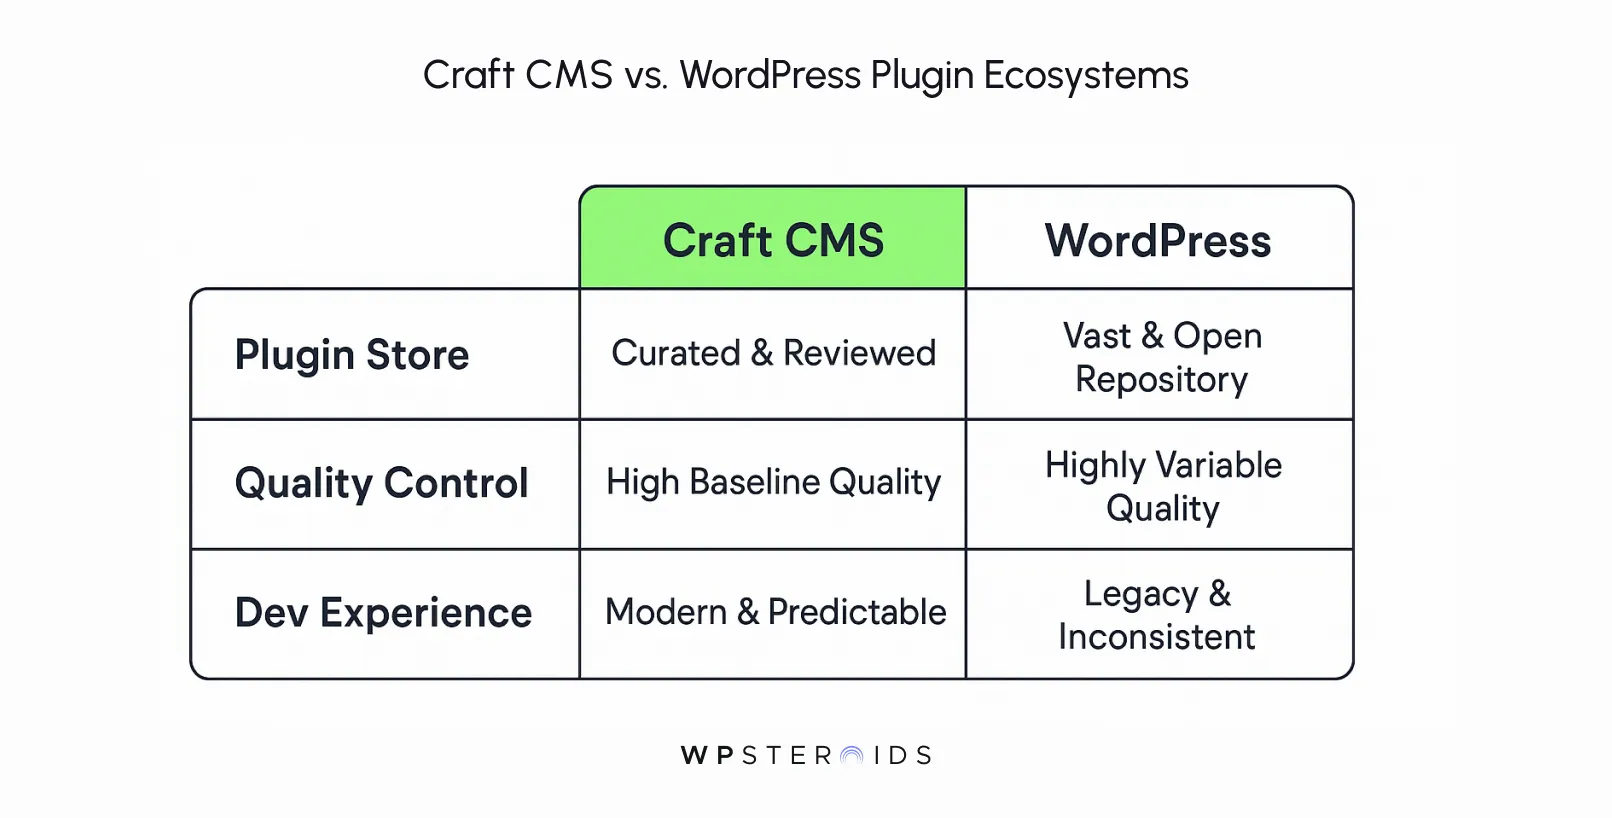
Your journey into extending Craft’s capabilities begins at the official Plugin Store. Accessible directly from your site's control panel or via the web, this is the central, curated, and trusted marketplace for discovering and acquiring plugins.
Think of it as the official app store for your website—every plugin listed has been reviewed by the Craft team, giving you a baseline of quality and security that you won't find elsewhere.
But with hundreds of options, opening the store for the first time can be overwhelming.
Let's reframe that.
Choosing and managing Craft CMS plugins is like building a tailored toolkit for a kitchen renovation.
The Plugin Store offers hundreds of options—like a massive hardware store filled with tools—but a professional chef selects only precise implements best suited for the space, the cuisine, and the workflow.
Just as a chef wouldn’t use every tool available, a developer needs guidance to select and maintain only the right plugins that truly enhance the project.
Your goal isn't to collect as many plugins as possible. It's to thoughtfully select the few, high-quality tools that solve your specific problems efficiently and reliably.
This mindset transforms the store from an endless scroll into a strategic resource.
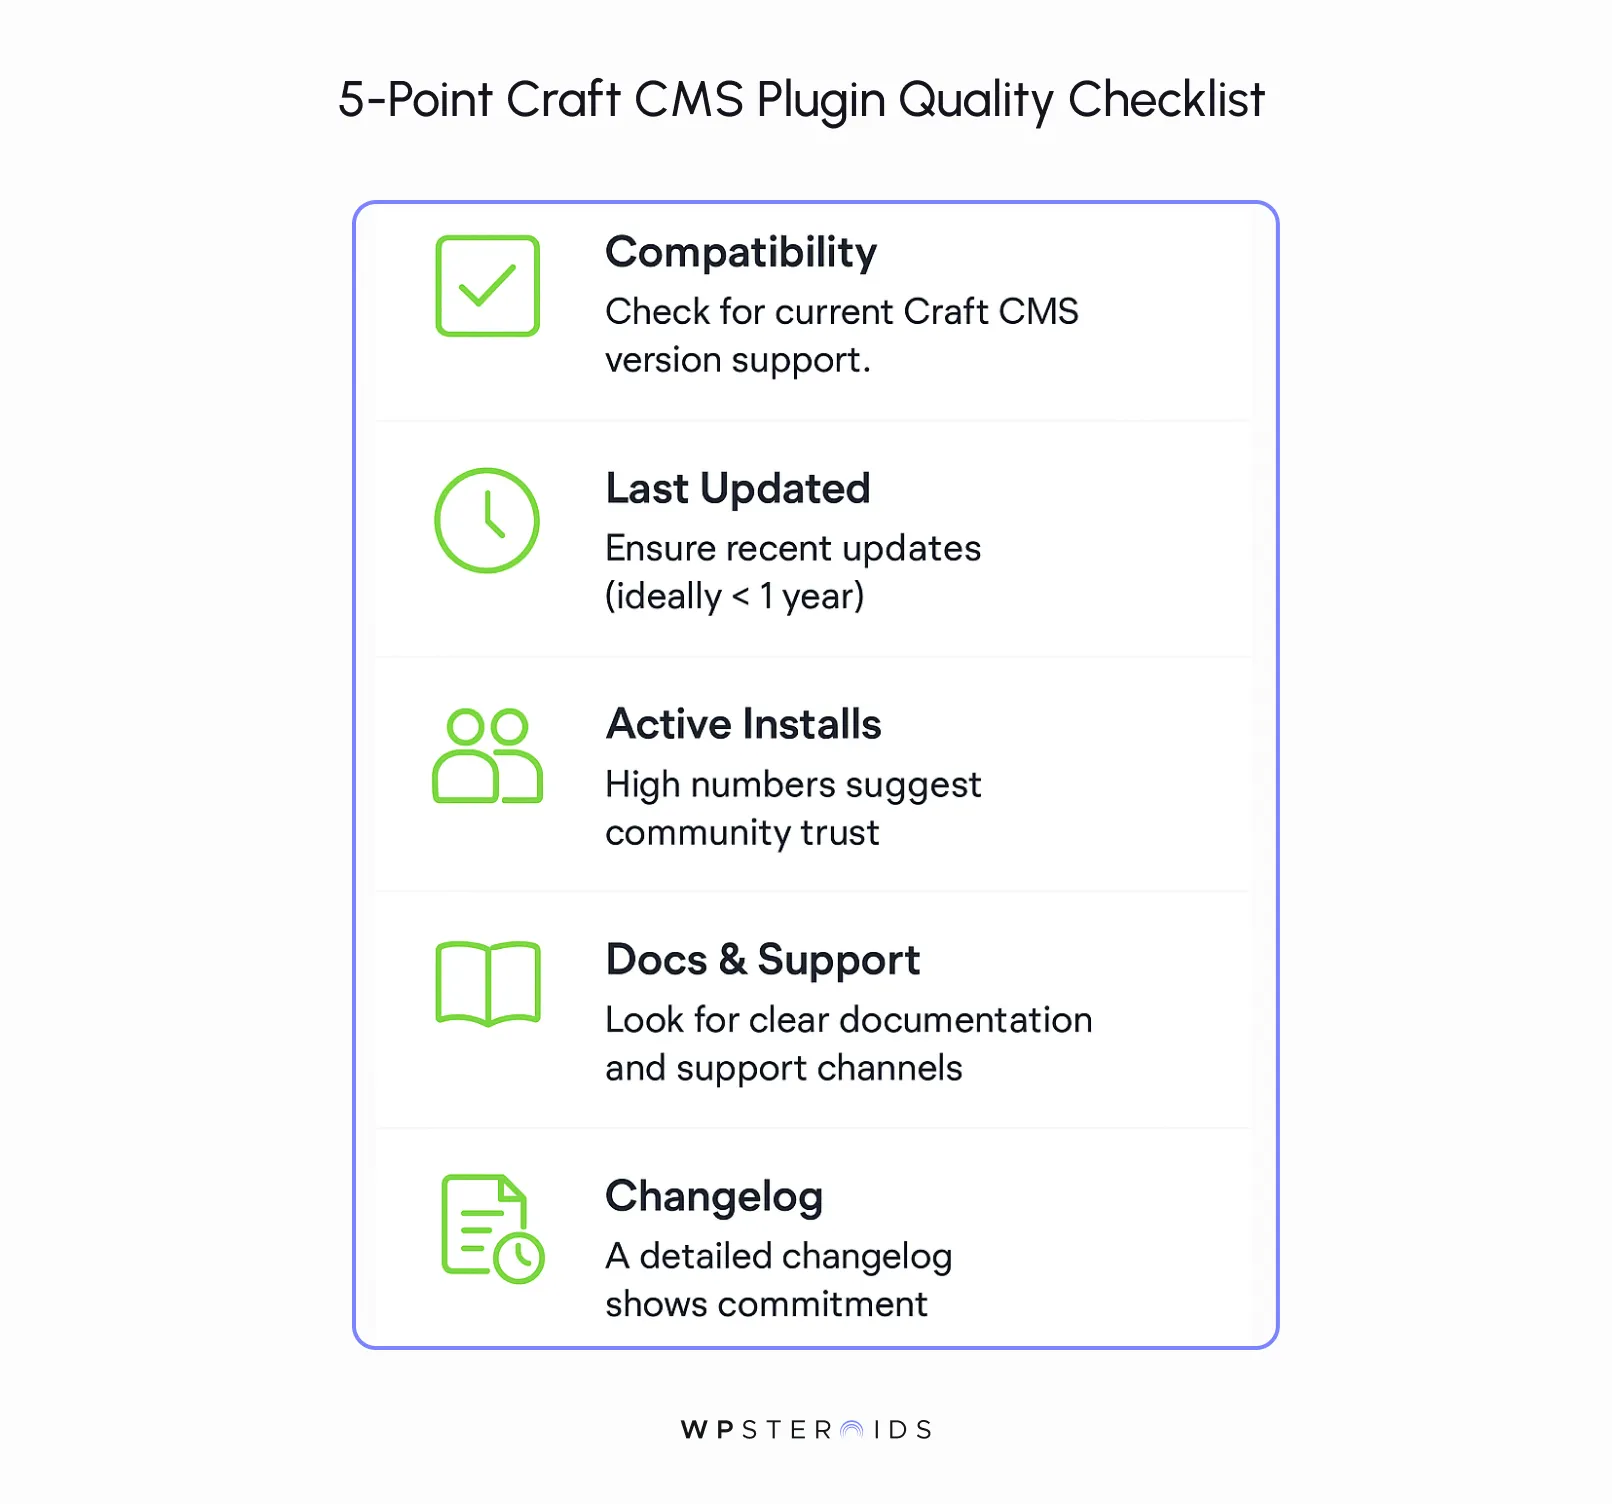
Before you even think about hitting "install," you need to do your due diligence. Vetting a plugin is a critical skill that will save you countless headaches.
Here’s what to look for in the plugin store:
Yes, but you should proceed with extreme caution. You can find Craft CMS plugins on public repositories like GitHub.
Developers might host plugins there that are still in beta, are designed for a niche audience, or haven't been submitted to the official store.
However, installing plugins from outside the built-in plugin store carries significant risks.
They haven't been reviewed by the Craft team, meaning they could contain security vulnerabilities, follow poor coding practices, or be abandoned without notice.
Once you know your way around the store, the next step is to refine your evaluation criteria.
The real craft cms plugin advantage isn't just about adding cool features; it's about extending your site's capabilities in a way that is stable, secure, and sustainable for the long haul.
This requires a shift in mindset.
It’s easy to get drawn in by a plugin that promises to do everything.
You see a long list of features, glowing five-star reviews, and you think, "This is the one." But this feature-first approach is a trap that can lead to significant technical debt.
The more complex a plugin is, the more likely it is to become a point of failure. Choosing stability and quality over sheer quantity of features is a crucial step in maturing as a developer.
So, what's the alternative? Professionals think about the entire lifecycle of a plugin, from installation to its eventual retirement years down the line.
This strategic view is essential when evaluating craft cms plugins for any serious project.
This isn’t just our opinion; it’s a documented shift in the professional community.
While most resources emphasize “feature-richness” or “popularity,” the 2024 Honcho Benchmark shows a growing trend: agencies are prioritizing plugin lifecycle management—focusing on long-term stability, upgrade paths, and robust support—over simply chasing new features or crowd-sourced reviews.
Developers are increasingly vetting plugins for migration readiness, ongoing compatibility with Craft 5, and strong documentation.
This means asking a different set of questions:
After establishing a framework for evaluation, it's time to name names.
This isn't just a list of the most popular downloads; it's a curated toolkit of the best Craft CMS plugins that consistently deliver on the promise of stability, support, and long-term value.
These are the tools we, and many other professional agencies, trust for business-critical projects.
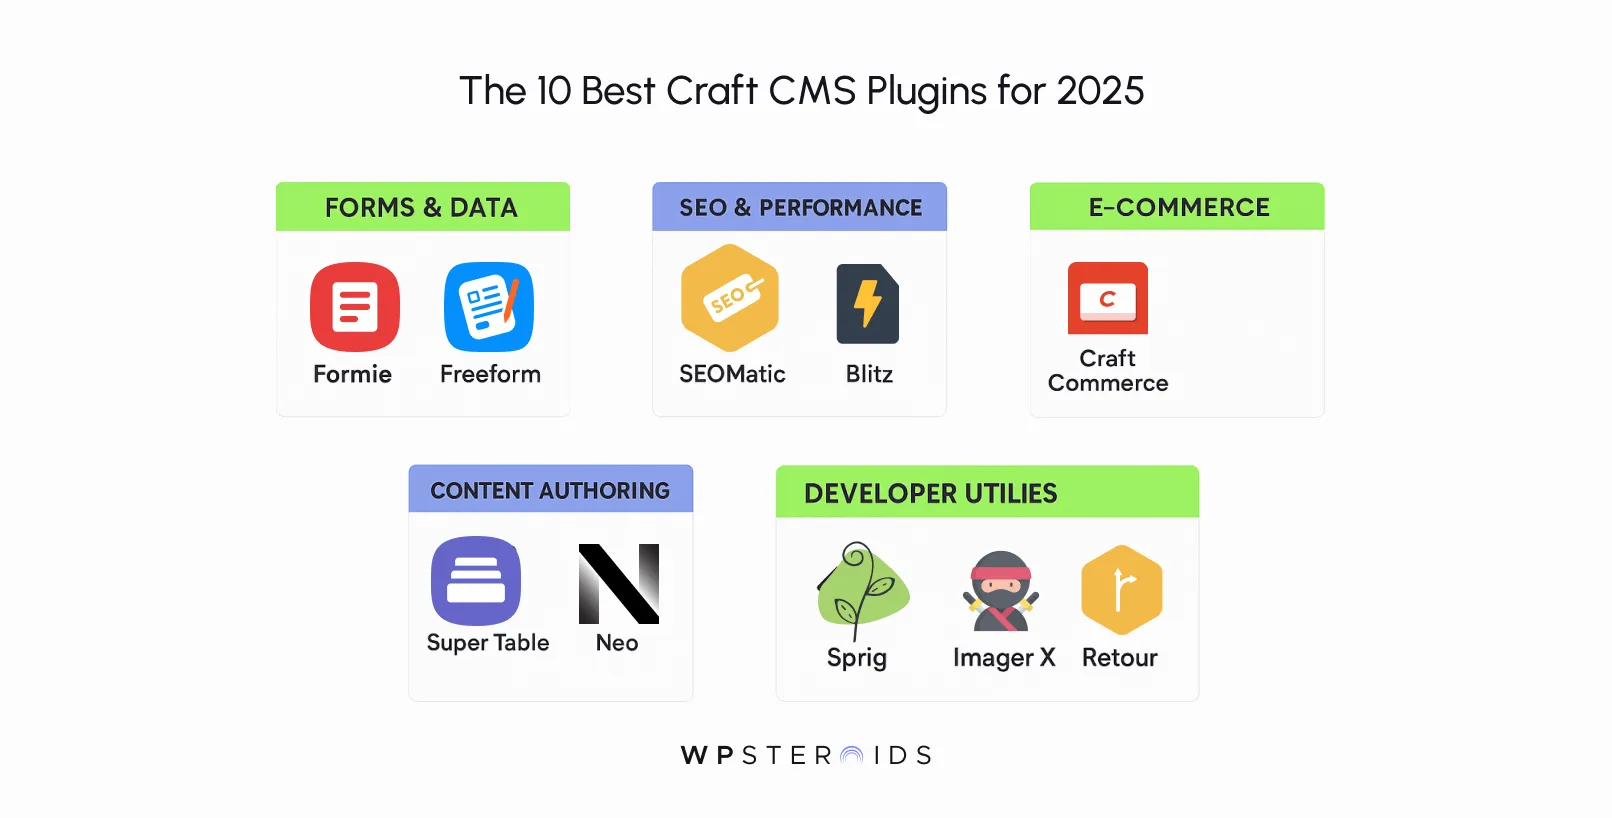
Nearly every website needs a way to capture user input, whether it's a simple contact form or a complex, multi-page application. A dedicated form builder plugin is a non-negotiable.
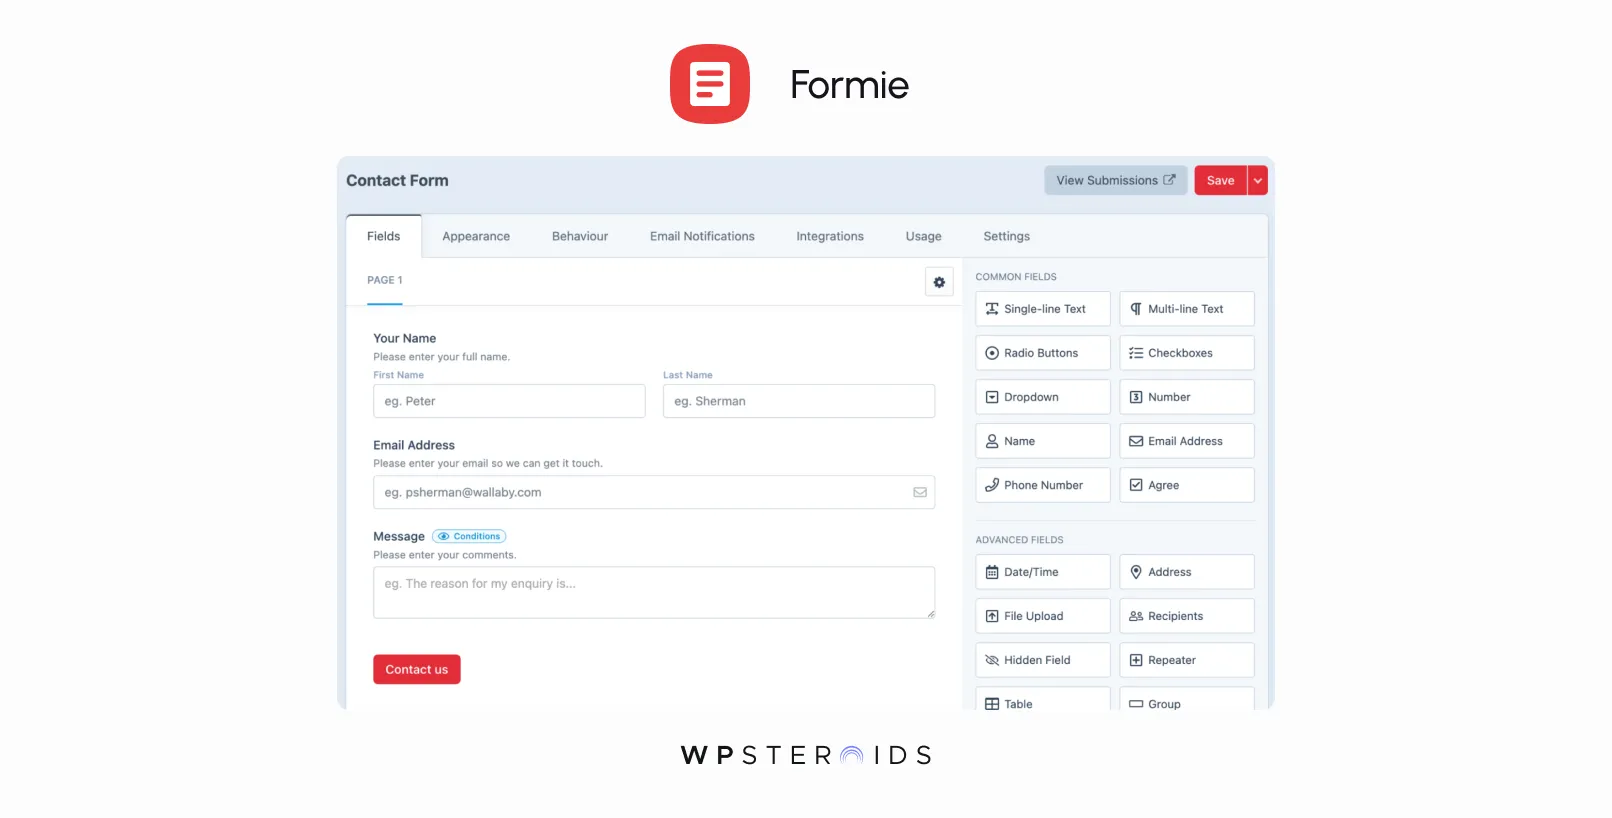
Plugin 1: Formie
It provides an intuitive drag-and-drop interface that clients love, while offering the robust features developers need, including multi-page forms, conditional logic, dozens of integrations with services like Stripe and Mailchimp, and excellent accessibility.
It’s a comprehensive solution for almost any data collection need.
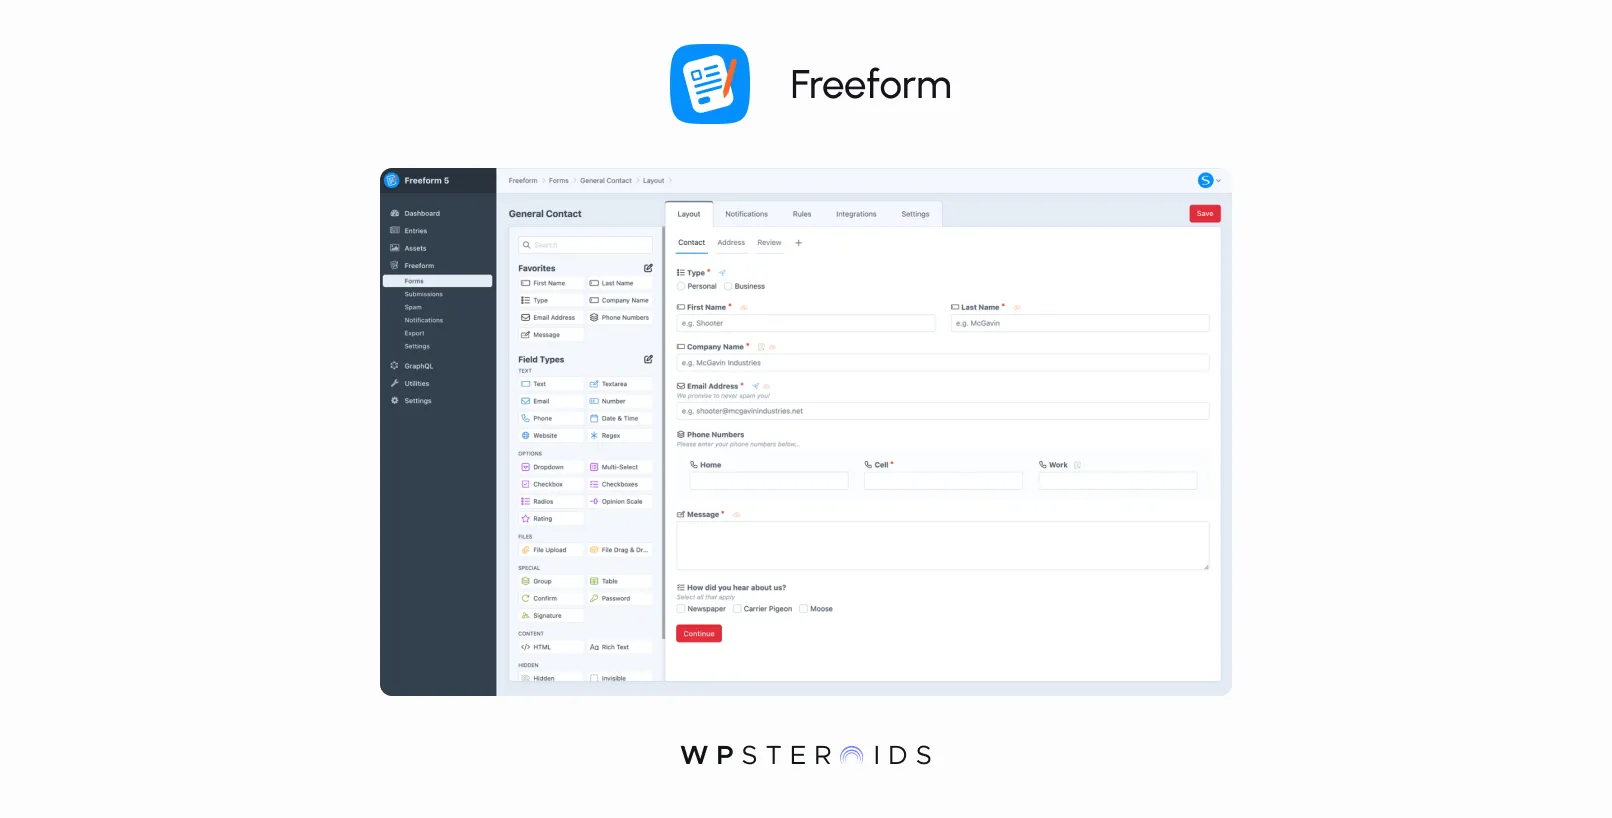
Plugin 2: Freeform
It offers a similarly rich feature set, including a clean interface, robust email notification options, and a wide array of field types.
It’s a rock-solid alternative and often comes down to personal preference in workflow.
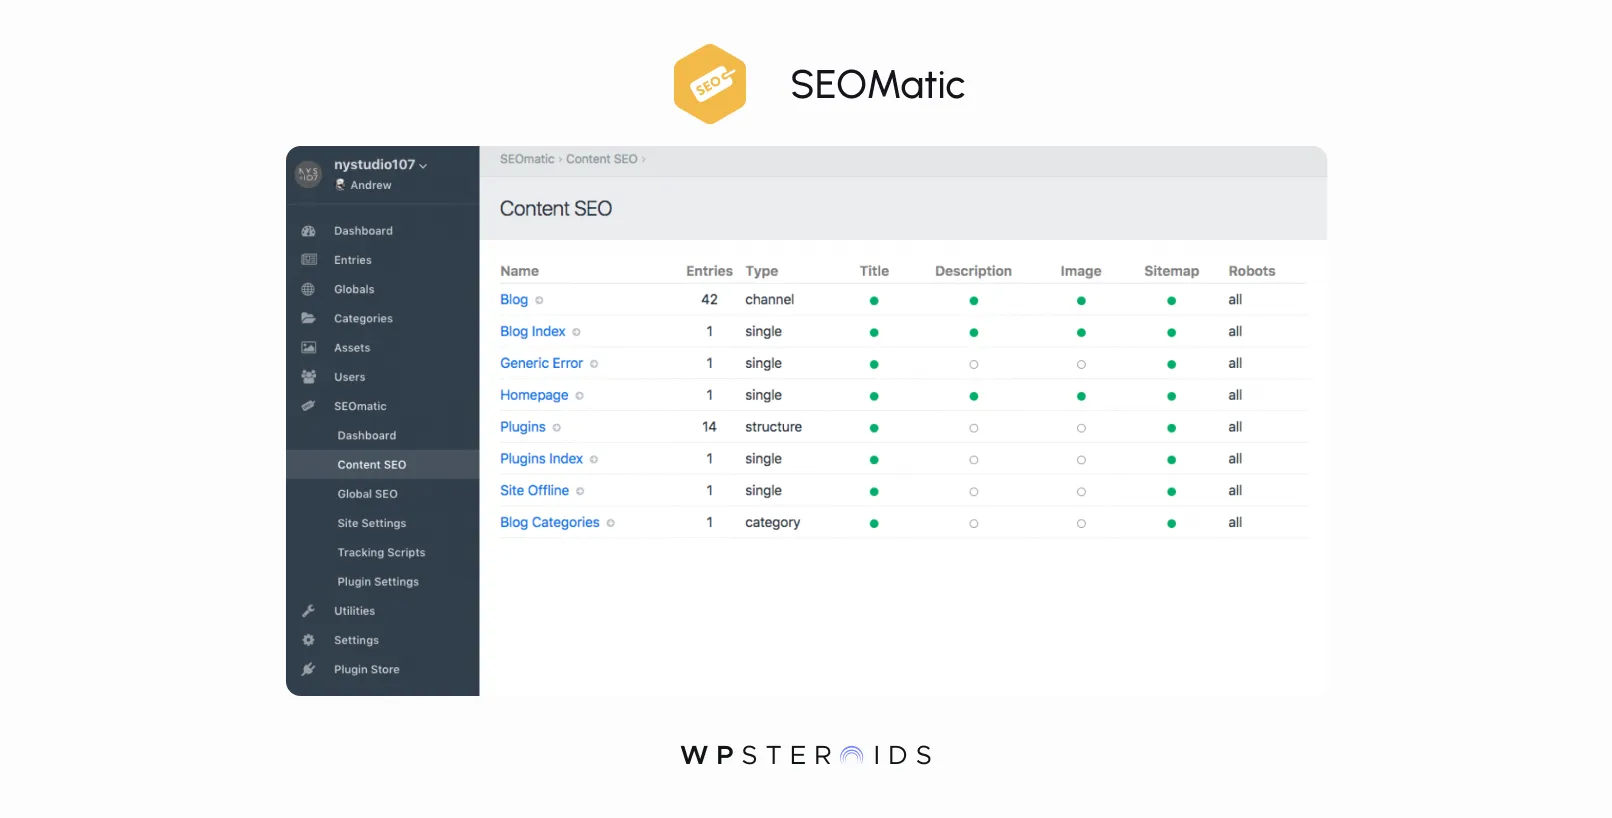
Plugin 3: SEOMatic
It’s a "set it and forget it" tool that gets the technical SEO right, letting you focus on content.
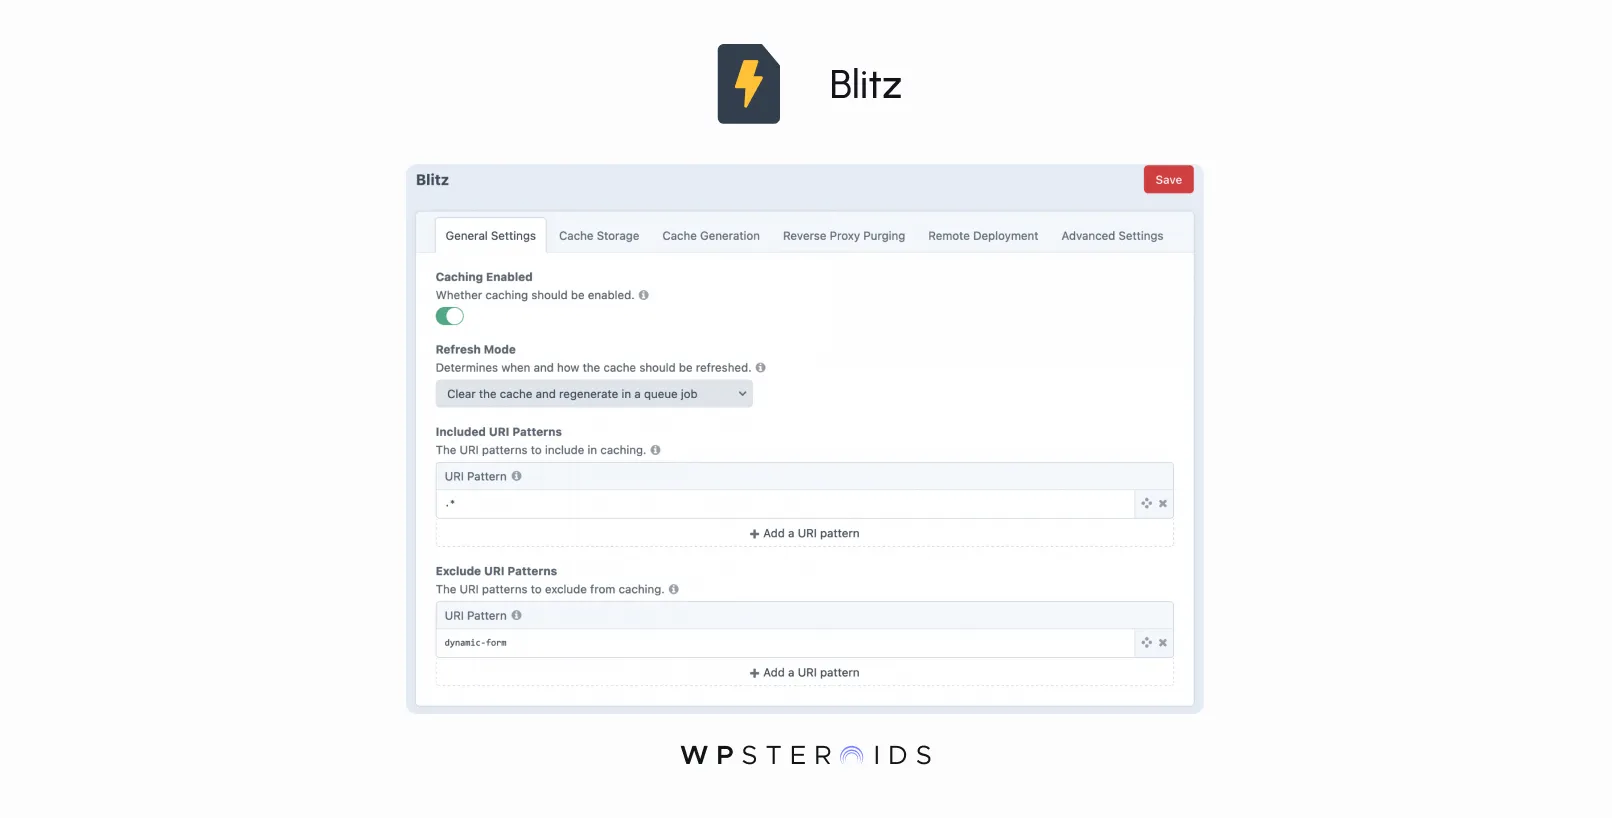
Plugin 4: Blitz
When a visitor arrives, the server can send this pre-built file instantly instead of querying the database and rendering the template on the fly. For content-heavy sites, the performance gains can be astounding.
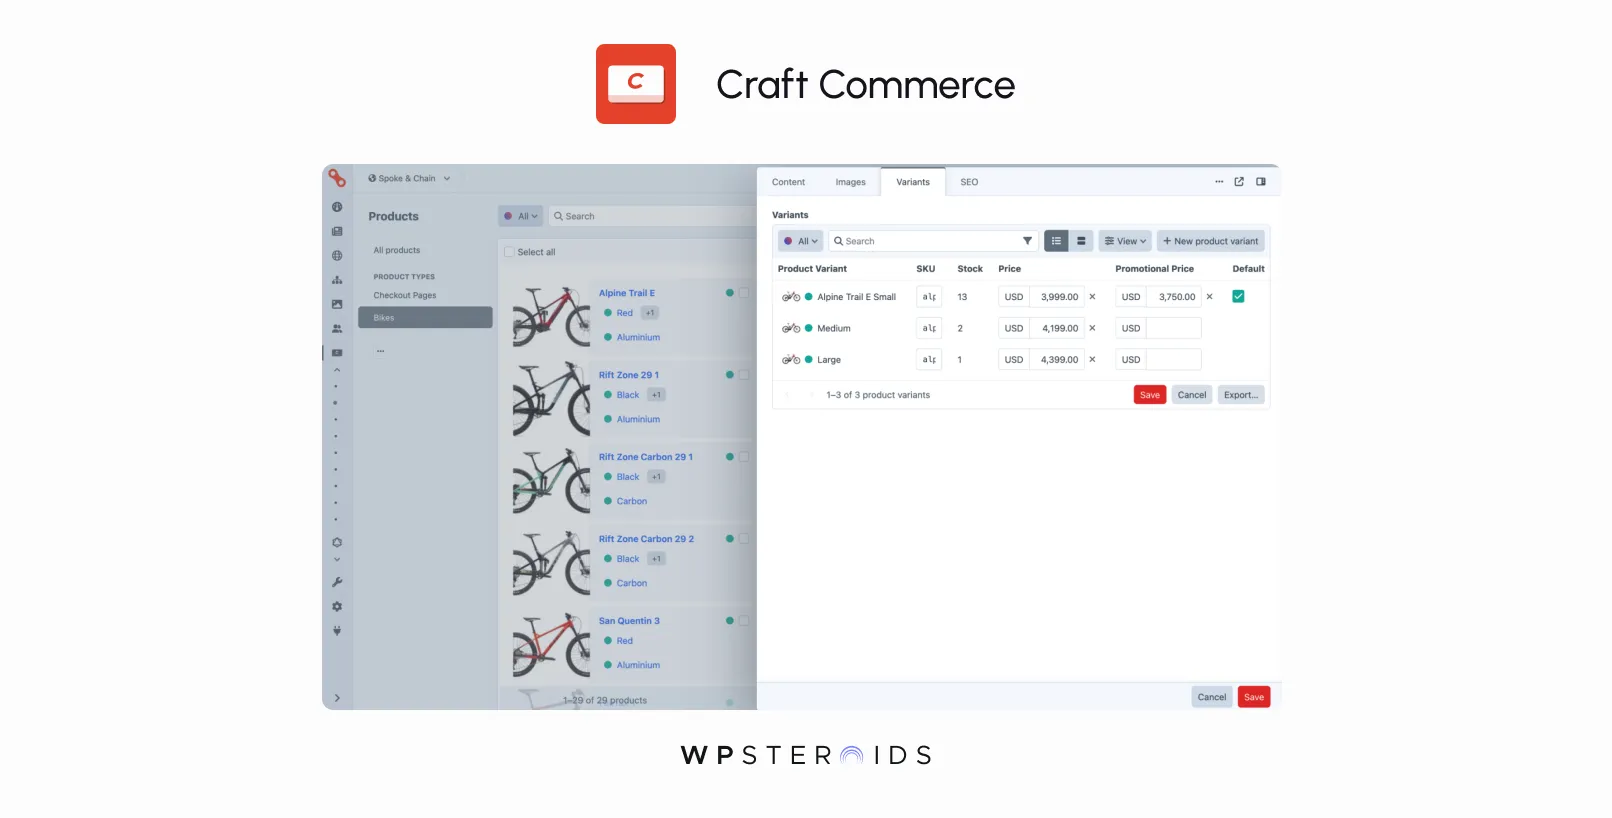
Plugin 5: Craft Commerce
It’s incredibly flexible, allowing you to build completely custom shopping experiences—from simple product pages to complex subscription models—without being locked into a rigid structure.
These plugins enhance Craft’s already legendary content editing experience, giving authors more power and flexibility.
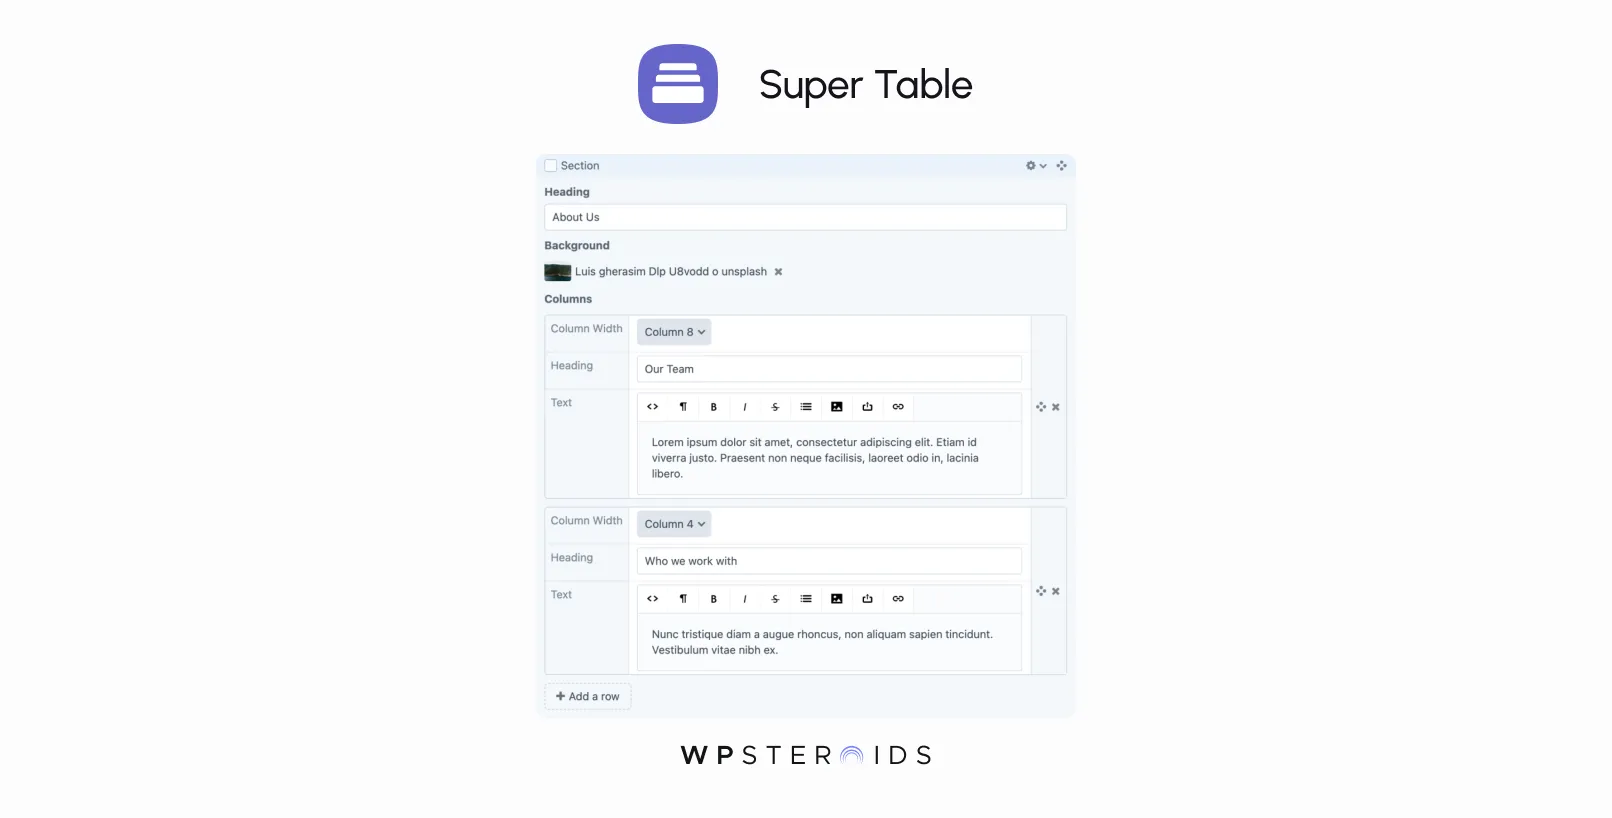
Plugin 6: Super Table
It’s perfect for creating structured, repeatable content within an entry, like a pricing table, a list of features, or a staff directory, without the full complexity of a Matrix field.
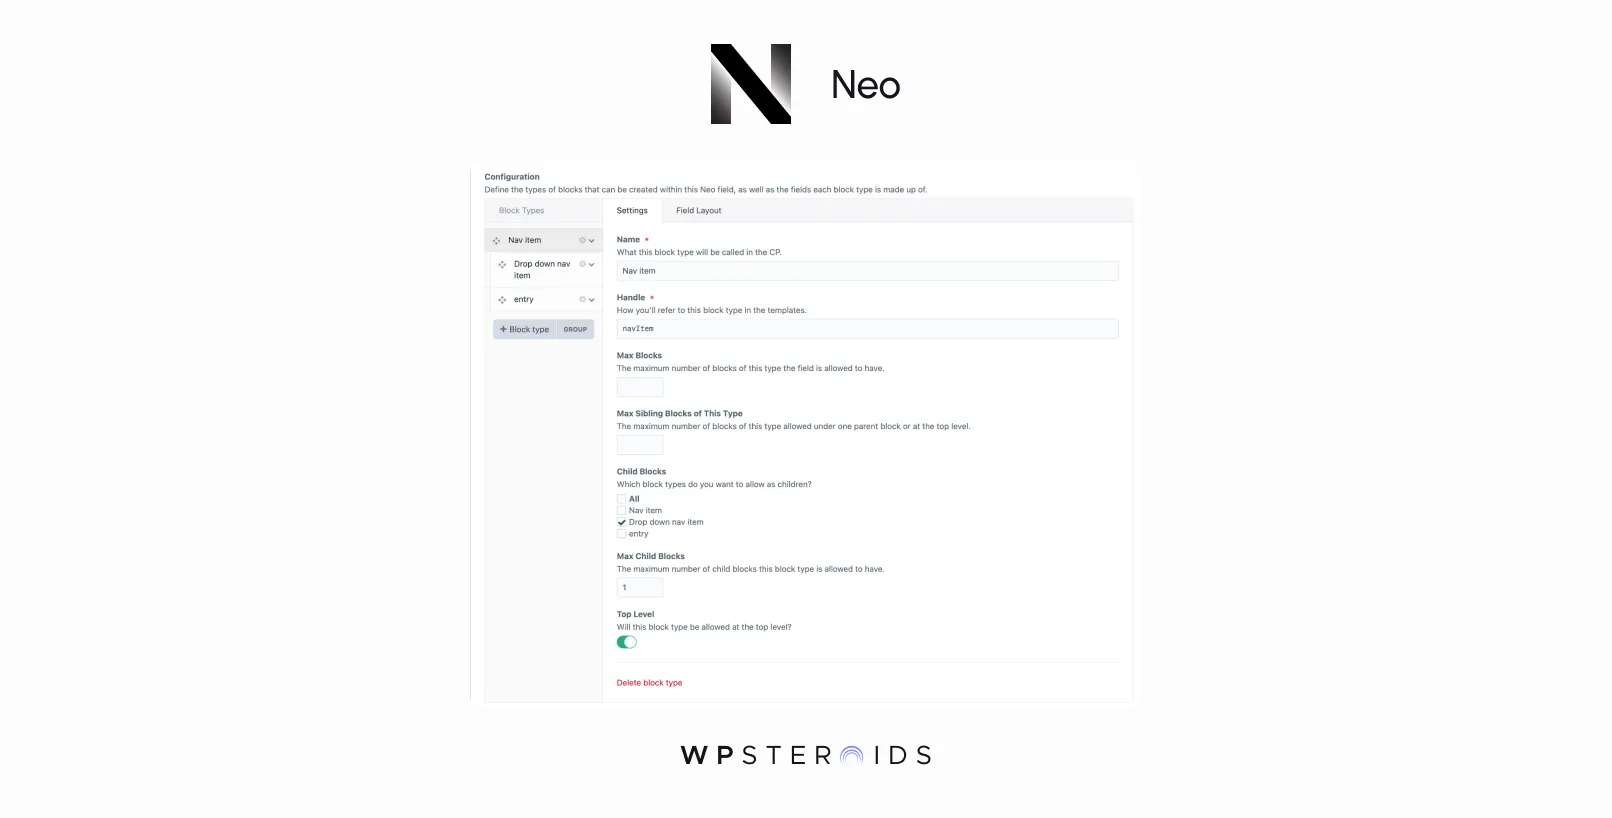
Plugin 7: Neo
For content-heavy sites that need maximum layout flexibility, Neo is a game-changer.
This category includes the unsung heroes—the tools that solve common problems, streamline development, and make managing a site much easier.
These are some of the best craft cms plugins for any developer's toolkit.
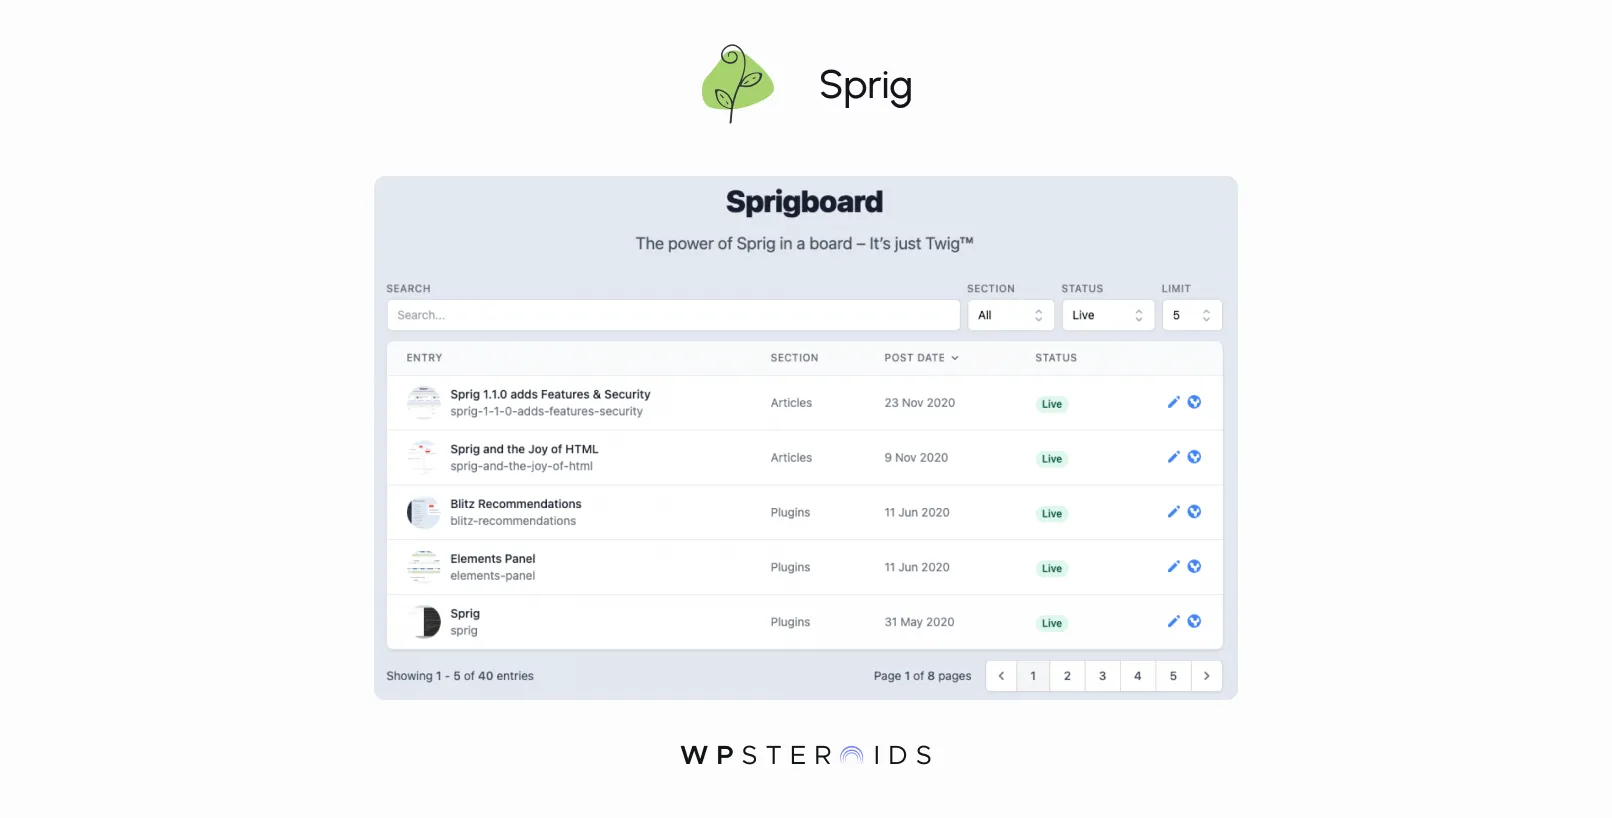
Plugin 8: Sprig
You can build things like live search, load-more buttons, or shopping carts without writing a single line of JavaScript.
It radically simplifies development and embraces the way Craft already works.
Plugin 9: Imager X
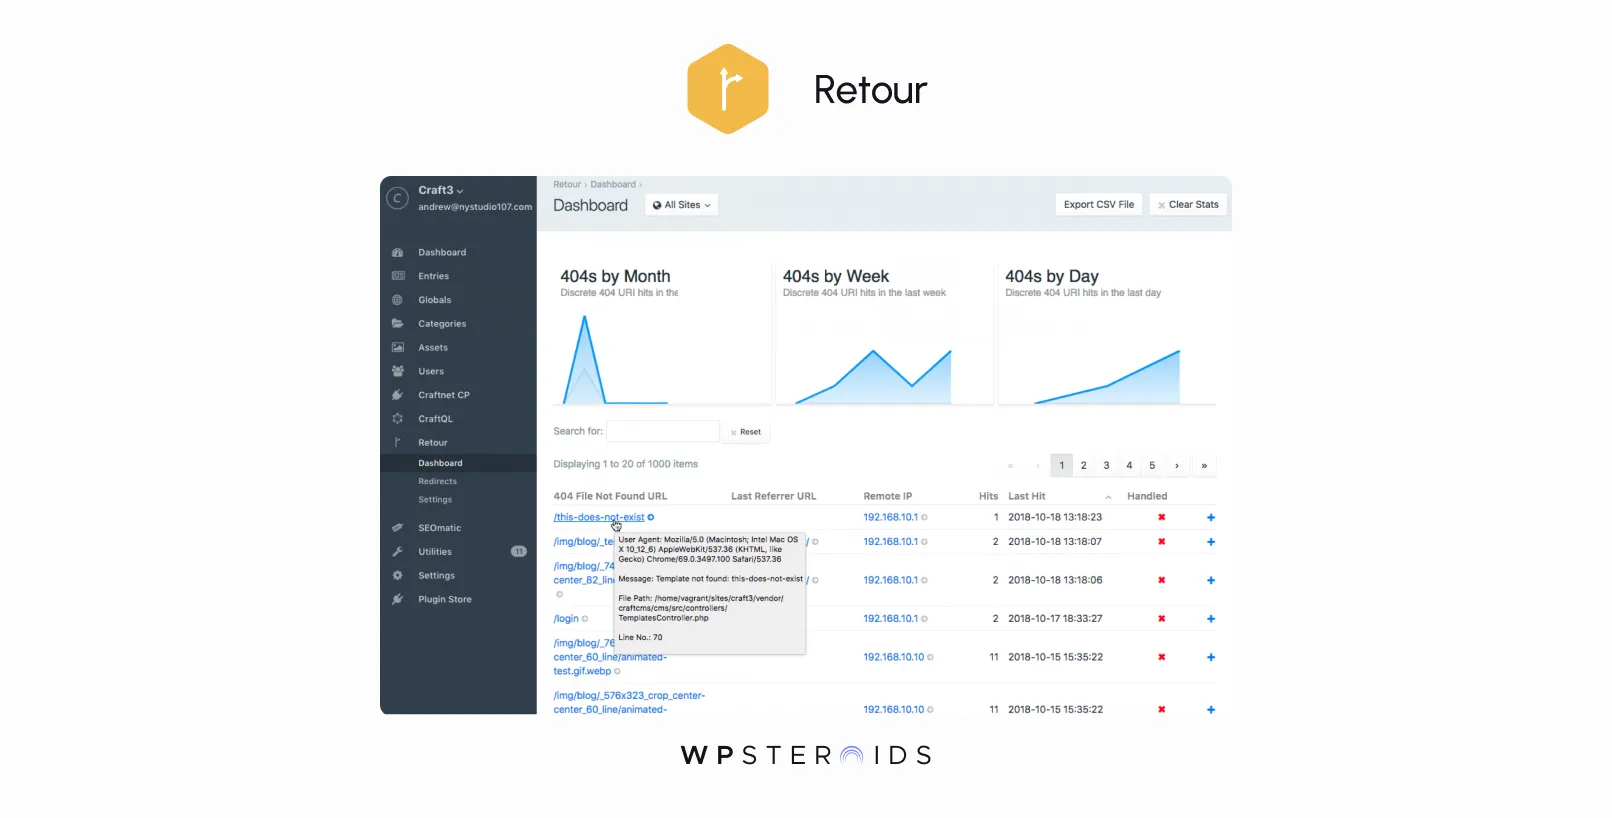
Plugin 10: Retour
It allows you to redirect old URLs to new ones easily and gives you a clear report of pages users are trying to access that don't exist, so you can fix them. It’s an essential tool for long-term site health.
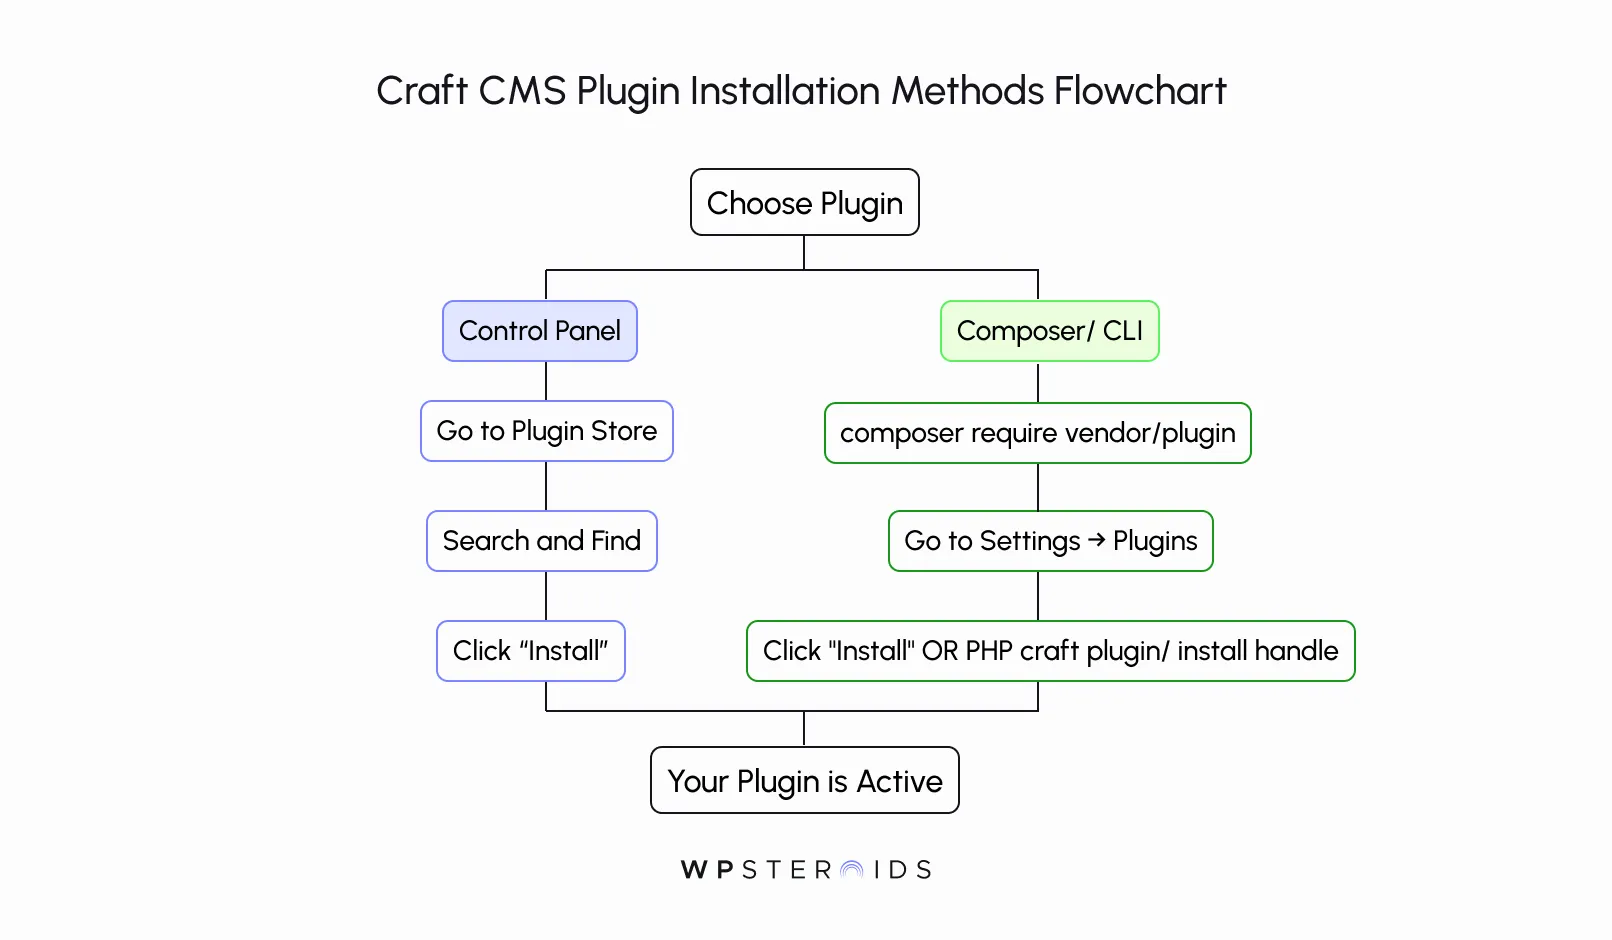
Once you've vetted a plugin and are confident it's the right choice for your project, it's time to add it to your site.
You have two primary methods to install a Craft CMS plugin, each suited to a different workflow.
This is the simplest and most direct method, perfect for quick additions and for users who prefer a graphical interface.
Craft will then automatically handle downloading the plugin's files via Composer and running the installation process.
You'll see a success notification once it's complete. This is the most straightforward way to add a plugin from the Craft control panel.
Once installed, the final step is to configure the plugin. Most plugins will add a new item to the main settings page or the sidebar, where you can manage its options and get it working exactly how you need.
Installing a plugin is just the first step. To ensure your website remains secure, performant, and stable for the long term, you need a proactive approach to management and updates.
This ongoing maintenance is arguably more important than the initial installation, as it protects your investment and prepares your site for future development and plugin updates.
Plugin developers release updates for many reasons: to patch security vulnerabilities, to add new features, or to ensure compatibility with new versions of Craft CMS.
Ignoring these updates is one of the biggest risks you can take with your site's health. But updating blindly can also cause problems.
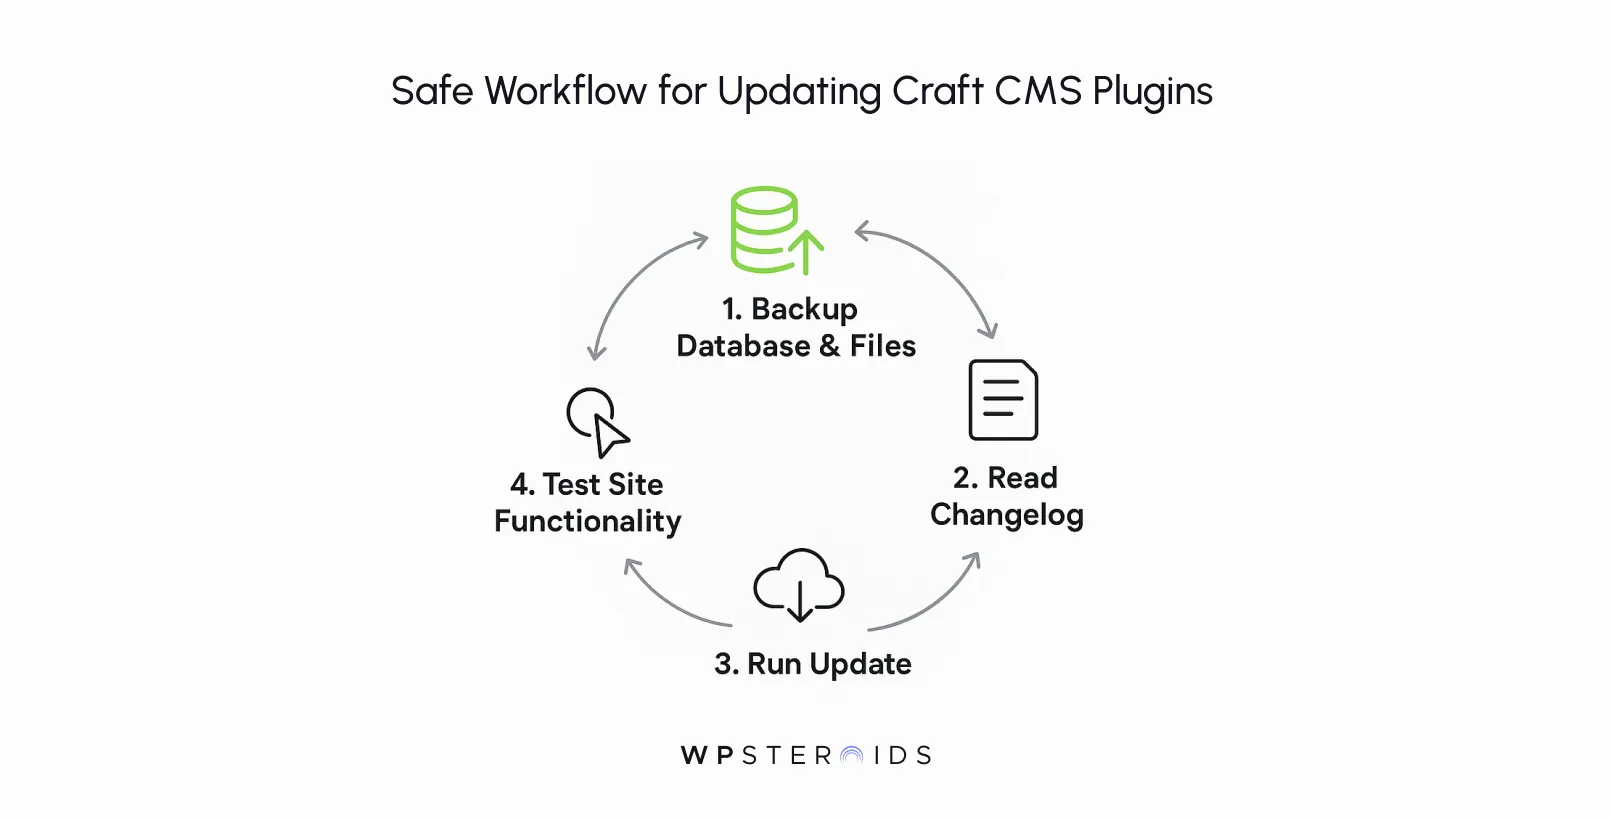
Here is a safe, repeatable workflow:
Developers typically place their plugin's settings in one of two places:
As a site admin, plugin settings are where you'll tailor the tool to your specific needs, so it's worth spending a few minutes exploring them after you install a new plugin.
Many high-quality plugins are built to support this. When a plugin is "multi-site aware," it means you can apply different settings for each site.
For example, with a plugin like SEOMatic, you can define different SEO title formats for your English site versus your Spanish site.
For a forms plugin, you can have email notifications go to different recipients depending on which site the form was submitted from.
You'll typically find a dropdown menu at the top of the plugin's settings page that allows you to switch between your configured sites and save settings on a per-site basis.
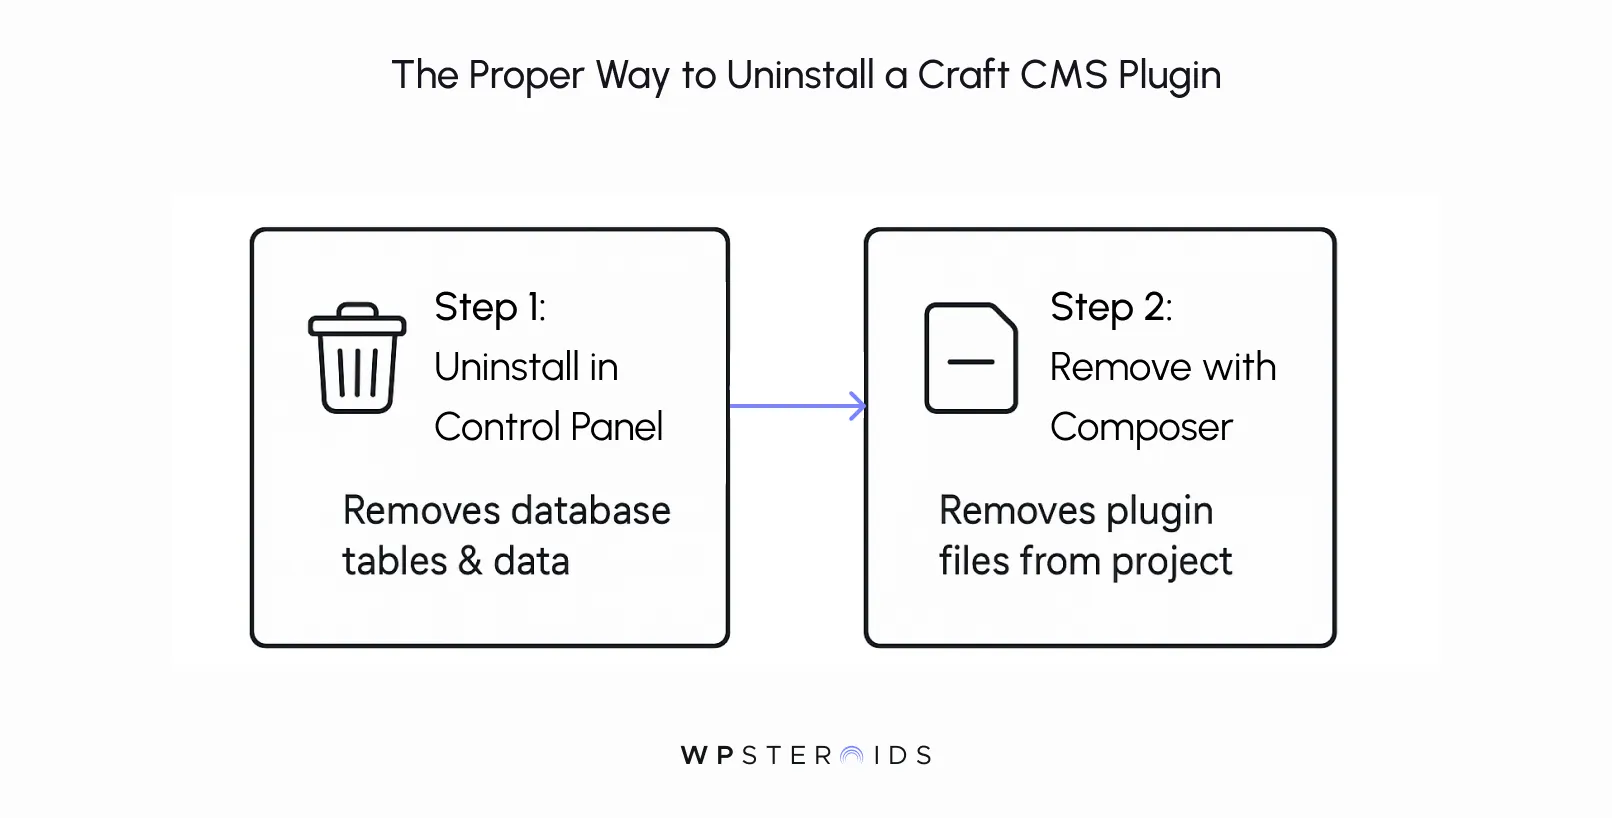
There comes a time in every website's lifecycle when a tool is no longer needed. Perhaps you've found a better solution, or the feature a plugin provided is no longer part of your strategy.
When you need to uninstall a plugin, it’s crucial to follow the correct procedure to ensure a clean removal and maintain the health of your site.
This process removes the plugin's code, database tables, and any other data associated with it.
Here is the proper, two-step process to completely uninstall a plugin:
This is a far better practice than simply deleting the plugin's folder, which can lead to errors and clutter in your database.
Even with careful vetting, things can sometimes go wrong. A plugin might conflict with another, an update might introduce a bug, or it might not work as expected in your specific server environment.
Knowing how to troubleshoot effectively is a critical skill for managing a healthy Craft CMS site.
The first and most important tool in your troubleshooting toolkit is the ability to disable a plugin.
First, let's be clear about the difference: disabling a plugin is a temporary and non-destructive action.
It deactivates the plugin's functionality on your site, but it preserves all of its settings and any data it has stored in the database.
Uninstalling, as we covered, is a permanent removal.
You should choose to disable a plugin in these scenarios:
To disable a plugin, simply go to Settings → Plugins. Find the plugin in the list and click the "Enabled" toggle to turn it off. The change is instant and easily reversible.
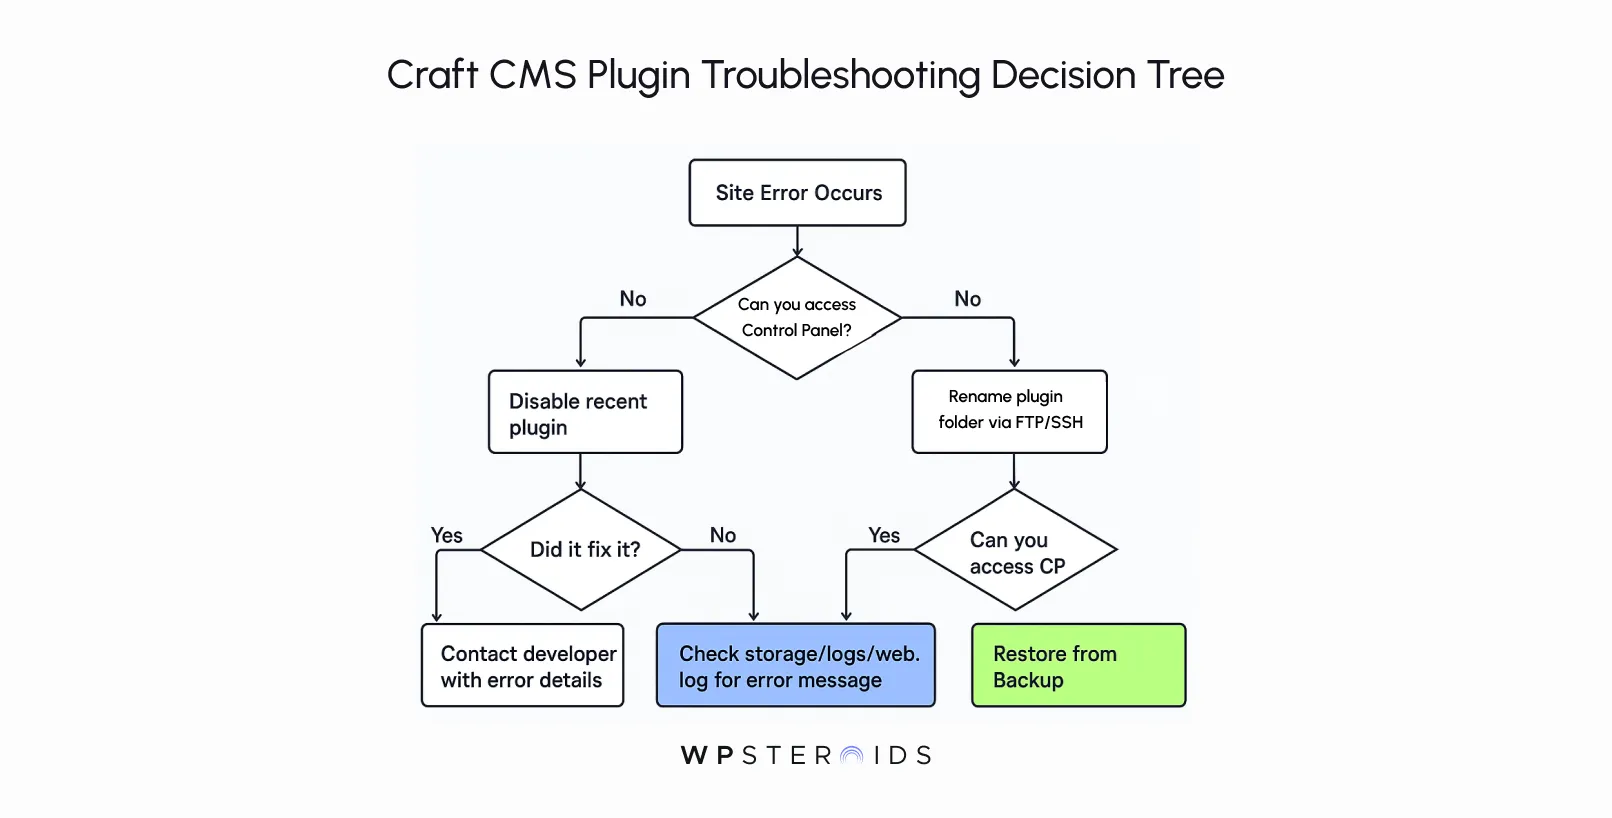
Seeing an error message instead of your website can cause a moment of panic, but don't worry.
There is a clear, logical path to follow to resolve the issue. If you suspect a plugin is being used that is causing a crash or unexpected behavior, follow these steps:
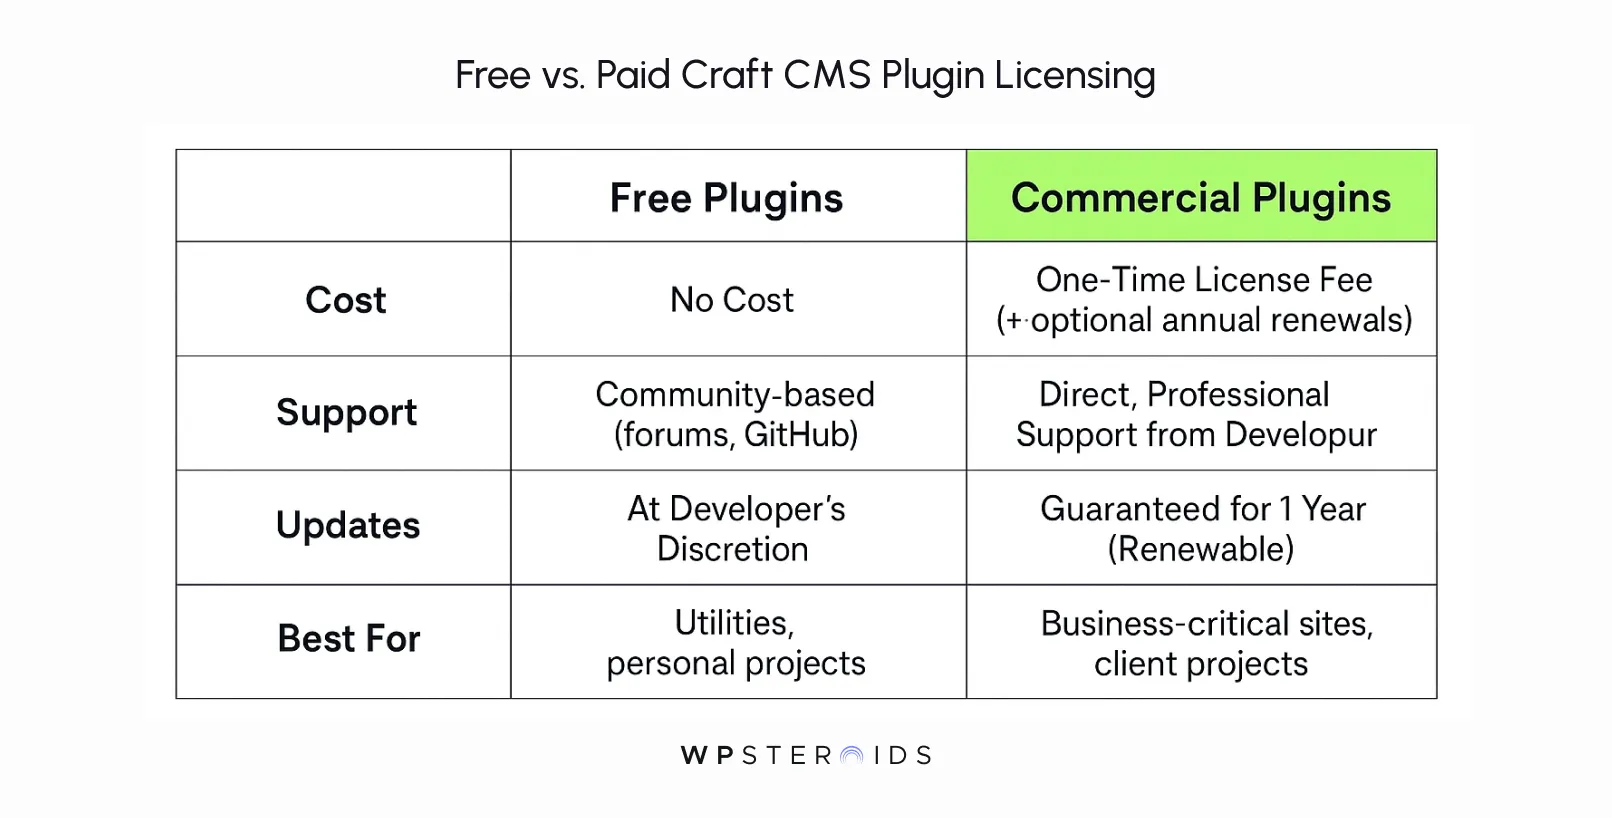
Understanding this distinction is key to building a sustainable and professionally supported website.
The licensing model is one of the great strengths of the Craft ecosystem, as it directly funds the developers who create and maintain these essential tools.
The short answer is: some plugins are free, and some require a paid plugin license.
Think of it this way: paying for a commercial plugin is an investment in your project's future stability.
It ensures the tool you rely on won't be abandoned and that you'll have a dedicated expert to turn to if you run into trouble.
When you purchase plugin licenses, they are all tied to your single Craft Console account. From there, you can easily manage them.
Inside the Craft control panel of a specific website, you'll be prompted to claim the licenses needed for that site from your Craft Console.
This simple process validates your purchase and officially associates the license with that web domain.
Your Craft Console dashboard also allows you to see all your licenses at a glance, transfer them between projects if needed, and manage renewal reminders for ongoing support and updates.
For freelance developers and agencies, managing plugin licenses across multiple client projects is a critical part of the job.
A disorganized approach can lead to confusion, expired updates, and unnecessary costs.
The process is designed to be simple and secure. When you purchase a license from the Plugin Store, it is added to your Craft Console account, not to a specific website. To activate it on a live site, you need to "claim" it:
Once you claim a license, Craft creates a license.key file in your project's config/ folder. This file is critically important.
You must commit to this license.key file to your project's version control repository (e.g., Git).
By keeping this file in your repository, you ensure that the license information travels with the project.
When another developer on your team pulls the project down, or when you deploy the site to a staging or production server, the license key is already present.
This prevents annoying "unlicensed plugin" warnings and ensures the commercial plugin is always recognized as active.
Needs change. A project might be handed over to a client, or a plugin used on one site might be better suited for a new project.
Once a license is released, it is returned to your pool of available licenses and can be claimed by a different website. This process is seamless and allows you to manage your investment in plugins efficiently, reallocating resources as your project portfolio evolves.
The initial purchase of a commercial plugin license typically includes one year of access to updates and direct developer support. It's important to understand what happens after that first year:
Renewals are offered at a significant discount compared to the initial purchase price.
For any professional website, keeping plugin licenses renewed is a fundamental best practice. It is a small annual investment that ensures the long-term security, stability, and health of the site.
When you build a website for a serious business, you're not just delivering a product; you're delivering a promise of reliability.
The tools you choose to build with are a direct reflection of that promise. In the Craft CMS world, the availability of professional-grade support for commercial plugins is a cornerstone of its growing reputation as an enterprise-ready platform.
This ecosystem of accountability is a significant CMS plugin advantage that sets it apart.
For a personal blog or a small brochure site, a free plugin with community-only support might be perfectly acceptable.
But for a business-critical e-commerce site, a high-traffic marketing platform, or a complex web application, the equation changes entirely.
The ability to get timely, expert support directly from the plugin developer is not a luxury—it's a core feature.
When evaluating Craft CMS plugins for these projects, the quality of support should be weighed just as heavily as the feature list.
This focus on professional, sustainable tools isn't happening in a vacuum. It's a direct response to the platform's rapid maturation and adoption by larger, more demanding organizations.
The data proves that Craft CMS is no longer just for small to medium-sized businesses; it's a major player in the enterprise space.
Over 50% of the top 100 global digital agencies now use Craft CMS as their default platform, and performance benchmarks show Craft 5 reduced average page load times by 20% across hosting environments.
What this means is that the stakes are higher than ever. When a Fortune 500 company or a major e-commerce brand is running on Craft, their tolerance for downtime, bugs, or security vulnerabilities is zero.
They demand a professional ecosystem.
This is the ultimate Craft CMS plugin advantage: the commercial plugin model ensures that developers are funded to provide the robust, enterprise-level support that these critical projects require.
Paying for a plugin is your insurance policy; it guarantees you have an expert to call on when you need one most.
But what happens when your project has a truly unique requirement that no off-the-shelf plugin can address? This is where the ultimate flexibility of Craft CMS shines: you can build your own.
Creating a custom plugin for Craft CMS is an advanced topic, but it’s a crucial skill for developers looking to take full control of the platform.
You should consider building a custom plugin when:
Remember the distinction between plugins and modules: if the code is highly specific to a single project and will never be used again, a module is often the better, more lightweight choice.
If the functionality is something you could imagine distributing or reusing, a plugin is the way to go.
Building your functionality into a well-structured plugin can also facilitate future development and plugin updates, keeping your custom code neatly organized and separate from the core business logic of the site itself.
So, where do you begin?
Building your own plugin is the final step in mastering the Craft ecosystem, allowing you to extend the platform in any direction you can imagine to meet the most demanding client needs.
Even with the most robust plugins, you'll occasionally run into a snag. A server configuration might be slightly different, or two plugins might not play nicely together.
Here are quick answers to the most common troubleshooting questions.
When your site isn't behaving as expected, and you suspect a plugin is the cause, follow this systematic checklist to diagnose the problem:
If a plugin update or installation causes a "white screen of death" or a visible error that locks you out of your site, don't panic.
First, determine if a plugin is being used that is preventing access to the control panel. If you can still get into the CP, immediately disable the plugin you last touched.
If you're completely locked out, you can force-disable it by connecting to your server via FTP or SSH, navigating to the vendor/ directory, and renaming the plugin's folder (e.g., renaming nystudio107/ to nystudio107-disabled/).
This will break the connection and allow Craft to load, letting you into the backend to properly address the issue. If all else fails, this is when you use the backup you made before the update.
Checking for compatibility with Craft versions is essential before any installation or major Craft CMS update.
You have two main ways to do this:
When you need to uninstall a plugin completely, a two-step process is required to ensure a clean removal. Simply deleting the folder is not enough and can leave orphaned data in your database.
Following both steps is the only way to properly and completely uninstall a plugin.
As you get more comfortable with the Craft CMS ecosystem, you'll start running into more specific, nuanced questions.
This is one of the most important architectural distinctions to understand as a Craft developer.
In short, if you want to reuse it for another project, build a plugin. If it’s a one-off feature for a single site, build a module.
You started this guide feeling overwhelmed by a "sea of plugins" and the fear of making the wrong choice.
Our mission was to transform that feeling into one of empowered clarity, and we hope we've succeeded.
The journey of extending Craft CMS with plugins isn't about collecting the most tools; it’s about having the best Craft CMS plugins—the right ones, managed correctly, for long-term success.
The fundamental shift we’ve advocated for throughout this guide is moving your focus from just features to long-term lifecycle management—prioritizing stability, robust support, and ongoing compatibility—to build a truly resilient and powerful Craft CMS website.
This strategic approach ensures that your initial choices facilitate future development and plugin updates, rather than hinder them. This is the real CMS plugin advantage.
By now, you should feel equipped to confidently navigate the Plugin Store, vet potential additions like a pro, and manage your chosen tools through their entire lifecycle.
You understand that investing in quality plugins and maintaining them diligently isn't just an expense—it's an investment in your project's performance, security, and scalability.
Ready to build a powerful, scalable website with the right plugin strategy, or need a team to manage your Craft CMS ecosystem with expertise?
Let's talk about how we can help transform your challenges into opportunities.
Book your discovery call today and turn that overwhelming sea of plugins into your strongest asset.
We've covered the strategy and best practices for managing plugins, but you might still have some specific questions.
Here are direct answers to the most common queries we hear from developers and project managers.
How do I install plugins in Craft CMS?
There are two primary methods to install and activate a plugin, catering to different workflows.
Are plugins free or paid in Craft CMS?
The Craft CMS Plugin Store features both free and paid (commercial) plugins.
What is a good list of Craft CMS plugins for enterprises?
For enterprise-level projects, the focus is on security, scalability, and professional support.
While many plugins are excellent, this short list is foundational for most large-scale builds:
How do I integrate third-party tools and plugins with Craft CMS?
Integration is typically achieved in one of two ways:
How do the Craft CMS plugins differ from modules?
This is a critical architectural distinction in Craft CMS:
What is the process for submitting a plugin to the official Craft Plugin Store?
Submitting a plugin to the store is a straightforward process for developers who want to share their work with the community.
The high-level steps are:
Is Craft CMS better than WordPress?
"Better" is subjective and depends entirely on the project's goals and the team's expertise.
However, they have fundamental differences, especially regarding their plugin ecosystems:
In summary, WordPress is an excellent choice for blogs and simpler sites, where Craft CMS excels in projects that require a high degree of customization.


