Contentful CMS allows teams to create, modify, and organize content efficiently.
From blogs to product information management or updating website content, adding or editing entries in Contentful is a fundamental skill for maintaining a dynamic digital presence.
As a headless CMS platform, Contentful ensures powerful tools to handle content creation and modifications while keeping all content consistent across all your digital channels.
Creating New Entries
To begin adding content in Contentful
- First log into your space. Look for the blue "Add entry" button in the top-right corner of your content list.
- When you click this button, you'll see a dropdown menu showing available content types. Content types are like templates that determine what fields your entry will have. For example, if you want to create a new blog post, you can select the "Blog Post" content type.
- Now, this template includes multiple fields like title, author, content, and featured image. All you have to do is, select the appropriate content type for your needs, and Contentful will create a new blank entry with all the necessary fields.
Understanding Entry Fields
After you create a new entry, you'll be able to see various fields to fill in.
Required fields are marked with an asterisk (*) and must be completed before publishing. Common field types include:
- Text fields: For titles, descriptions, and body content
- Media fields: For images, videos, and other files
- Reference fields: To link to other entries
- Slug fields: For URL-friendly versions of your titles
Each field serves a specific purpose in structuring your content.
Take time to fill in each field accurately, as this information will be used across your digital platforms.
Formatting Your Content
Contentful offers two main ways to format your content:
Rich Text Editor
Similar to familiar word processors, with buttons for:
- Text Styling
- Bold (Ctrl/Cmd + B) for emphasizing important points
- Italic (Ctrl/Cmd + I) for subtle emphasis or terminology
- Underline (Ctrl/Cmd + U) for highlighting key terms
- Color options for text highlighting and emphasis
- List Organization
- Bulleted lists for unordered information and key points
- Numbered lists for step-by-step instructions
- Nested lists for hierarchical information
- Indentation controls for list formatting
- Content Structure
- H1 to H6 headers for clear content hierarchy
- Multiple paragraph styles for varied content presentation
- Block quotes for featuring important quotes or excerpts
- Customizable spacing options
- Advanced Features
- Interactive tables with merge and split cell options
- Hyperlinks with custom text and tooltips
- Embedded media support (images, videos)
- Copy-paste formatting preservation
Markdown
For those who prefer coding-style formatting:
- Use # for headers
- * or _ for emphasis
- [ ]() for links
- Simple table syntax
Choose the formatting option that best suits your workflow and comfort level.
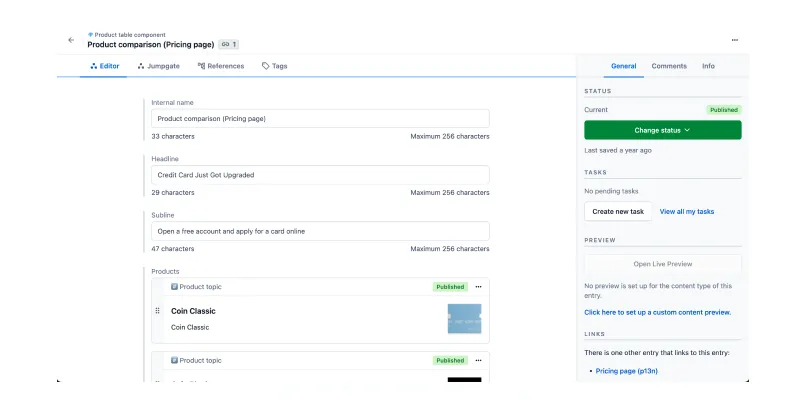
Editing Existing Entries
To modify existing content, locate the entry in your content list and click to open it.
The entry editor allows you to:
- Update any field's content
- Add or remove media
- Modify references
- Change entry status
While editing, you'll notice the presence indicator showing who else is currently working on the entry, helping prevent conflicts in collaborative environments.
When adding media to your entries:
- Click the media field or use the embed option in Rich Text
- Choose from existing assets or upload new ones
- Add metadata like alt text and descriptions
- Optimize images for web performance
Remember to consider file sizes and formats for optimal loading times.
Saving and Publishing
As you work on your entry, Contentful automatically saves your changes as drafts. To publish:
- Review all required fields
- Check for validation errors
- Preview your content if available
- Click "Publish" when ready
You can also schedule publications for future dates or save versions for later reference.
Best Practices
To maintain high-quality content:
- Use clear, descriptive titles
- Follow consistent naming conventions
- Complete all metadata fields
- Preview content before publishing
- Regularly review and update existing entries
Remember to coordinate with team members when working on shared content, and utilize the presence indicator to avoid conflicts.